---
title: "bUnit for Blazor and How to Integrate it in Azure Pipeline"
published_at: "2020-07-22T10:00:52+00:00"
modified_at: "2025-04-23T06:53:28+00:00"
url: "https://www.syncfusion.com/blogs/post/bunit-for-blazor-and-how-to-integrate-it-in-azure-pipeline"
excerpt: "What is unit testing? Unit testing is a level of software testing that is used by developers to ensure that the implemented logic meets its requirements and behaves as expected. What is bUnit? bUnit is a testing library for Blazor..."
taxonomy_category:
  - "Azure"
  - "Blazor"
  - "Web"
taxonomy_post_tag:
  - "Azure"
  - "Blazor"
  - "productivity"
  - "unit testing"
  - "Web Development"
  - "What's New"
---

# bUnit for Blazor and How to Integrate it in Azure Pipeline

[Ramkumar Shanmugam](https://www.syncfusion.com/blogs/author/ramkumar-shanmugam)

![bUnit for Blazor and How to Integrate it in Azure Pipeline](https://www.syncfusion.com/blogs/wp-content/uploads/2020/07/bUnit-for-Blazor-and-How-to-Integrate-it-in-Azure-Pipeline-2.png)


## What is unit testing?

Unit testing is a level of software testing that is used by developers to ensure that the implemented logic meets its requirements and behaves as expected.

## What is bUnit?

**bUnit** is a testing library for Blazor components used to write comprehensive and stable unit test cases. It allows you to write test cases in C# or Razor syntax to verify outcomes with semantic HTML diffing and comparison logic. With it, you can interact with components, event handlers, and cascading values; inject services; mock IJSRuntime; and take snapshots.

bUnit is not a unit test runner, but it is built on top of traditional unit testing frameworks such as xUnit, NUnit, and MSTest.

Now, let’s learn how to write a test in C# for Blazor components!

## Topics we’ll cover

- Create a simple Blazor application.
- Create a new bUnit test project.
- Create a unit test case.
- Create a test case for event handlers.
- Pass parameters to the component.
- Configure bUnit into a setup.
- Inject services.
- Mock IJSRuntime.
- Integrate bUnit with an Azure Pipeline.
- Advantages of bUnit.
- Limitations of bUnit.

## Prerequisites

- Visual Studio 2019.
- **ASP.NET and web development** workload.

## Create a simple Blazor application

Follow these steps to create a Blazor application:

1. Open **Visual Studio 2019**.
2. Click **Create a new project**.
3. Select **Blazor App** and then click ** Next** as shown in the following screenshot. ![Create a New Project Dialog Box](https://www.syncfusion.com/blogs/wp-content/uploads/2020/07/Create-a-New-Project-Dialog-Box.png)
4. Provide a **Project name** or accept the default project name. Then, select a ** Location** for the project and click ** Create**. ![Provide a Project name and select a location](https://www.syncfusion.com/blogs/wp-content/uploads/2020/07/Provide-a-Project-name-and-select-a-location.png)

The Blazor app will be created.

## Creating a new bUnit test project

Follow these steps to create a project for testing Blazor components:

1. Create a new NUnit testing project. Refer to this guide if you don’t know how: [https://www.syncfusion.com/blogs/post/how-to-integrate-unit-testing-with-asp-net-core-3-1.aspx](https://www.syncfusion.com/blogs/post/how-to-integrate-unit-testing-with-asp-net-core-3-1.aspx) . ![Solution Explorer showing the Blazor.Test Project](https://www.syncfusion.com/blogs/wp-content/uploads/2020/07/Solution-Explorer-showing-the-Blazor.Test-Project.png)
2. Right-click the **test project** and select ** Manage Nuget Packages**as shown in the following screenshot. ![Select Mange NuGet Packages](https://www.syncfusion.com/blogs/wp-content/uploads/2020/07/Select-Mange-NuGet-Package.png)
3. Search for the keyword **bunit.web**. The results will be displayed as follows. Select ** bunit.web**and install it. ![Selecting bunit web NuGet package](https://www.syncfusion.com/blogs/wp-content/uploads/2020/07/Selecting-bunit-web-NuGet-package.jpg)
4. Ensure that the NuGet package is installed. ![bunit web NuGet package installed](https://www.syncfusion.com/blogs/wp-content/uploads/2020/07/bunit-web-NuGet-package-installed.png)

## Create a unit test case

Now, we are going to write a test case for a Razor component.

1. Add a Razor component to the Blazor project as shown in the following screenshot. ![Add a Razor component to the Blazor project](https://www.syncfusion.com/blogs/wp-content/uploads/2020/07/Add-a-Razor-component-to-the-Blazor-project.png)
2. Add a test class file in the test project. ![Add a test class file in the test project](https://www.syncfusion.com/blogs/wp-content/uploads/2020/07/Add-a-test-class-file-in-the-test-project.png)
3. Write the following code into the test class.``` [SetUp] public void Setup() { } [Test] public void HelloSyncfusionComponentTest() { // Arrange using var context = new Bunit.TestContext(); string expectedMarkup = "<h3>HelloSyncfusion</h3>"; // Act var cut = context.RenderComponent<BlazorbUnit.HelloSyncfusion>(); // Assert cut.MarkupMatches(expectedMarkup); } ``` ![Write the highlighted code into test class](https://www.syncfusion.com/blogs/wp-content/uploads/2020/07/Write-the-highlighted-code-into-test-class.png) In this code: using var context = new Bunit.TestContext(); creates an instance of the **bunit.TestContext** class. Here, we are using the ** using var** syntax to avoid unnecessary indention. string expectedHTML = “<h3>HelloSyncfusion</h3>”; is Blazor component markup. var cut = context.RenderComponent<BlazorbUnit.HelloSyncfusion>(); renders the Blazor component using ** TestContext**. cut.MarkupMatches(expectedHTML); verifies the rendered markup from the component using the ** MarkupMatches** method. This performs a semantic comparison of the expected markup with the rendered markup.
4. Build the project and ensure the build succeeds. Then select **View** > ** Test Explorer**as in the following screenshot. ![select View and then select Test Explorer](https://www.syncfusion.com/blogs/wp-content/uploads/2020/07/select-View-and-then-select-Test-Explorer.png) Now, you will see the list of test methods. ![List of test methods](https://www.syncfusion.com/blogs/wp-content/uploads/2020/07/List-of-test-methods.png)
5. Right-click the **HelloSyncfusionComponentTest** method, and then click ** Run**. ![Right-click the HelloSyncfusionComponentTest method, and then click Run](https://www.syncfusion.com/blogs/wp-content/uploads/2020/07/Right-click-the-HelloSyncfusionComponentTest-method-and-then-click-Run.png) The test run is successful, and the test case passes. You can also alter the test case if it fails. ![Test run is successful, and the test case passes](https://www.syncfusion.com/blogs/wp-content/uploads/2020/07/Test-run-is-successful-and-the-test-case-passes.png)

**Note:** This is a component rendered test case. So, if the test case passes, the component will be rendered successfully.

## Test case for event handlers

Follow this procedure to create a test case for an event handler:

1. Use the code as shown below in the **HelloSyncfusion.**** razor** component.``` @page "/HelloSyncfusion" <h3>HelloSyncfusion</h3> <button class="btn btn-primary" @onclick="ClickMeToSayHi">Ping Me</button> @if (IsVisible) { <h5>Hi Syncfusion, nice to meet you :)</h5> } @code { public bool IsVisible { get; set; } = false; protected void ClickMeToSayHi() { IsVisible = true; } } ``` In the above code, we have written a test case for the **@**** onclick**=”ClickMeToSayHi” event. After the button is clicked, a message will be shown below it. This operation is handled in this event.
2. Use the following code in **HelloSyncfusionTest.**** cs**.``` [Test] public void SayHiByClick() { // Arrange using var context = new Bunit.TestContext(); // Act var cut = Context.RenderComponent<BlazorbUnit.HelloSyncfusion>(); cut.Find("button").Click(); // Assert cut.Find("h5").MarkupMatches("<h5>Hi Syncfusion, Nice to meet you :)</h5>"); } ``` From the test method, var cut = Context.RenderComponent<BlazorbUnit.HelloSyncfusion>(); renders the Blazor component. Then, using the ** Find** method, the button is located using the component tag, class, or ID, and the click event is triggered by using the code ``` cut.Find(“button”)[0].Click(); ``` This triggers the click event and shows the message. Then, find the message markup and compare it with the expected markup using following code. ``` cut.Find("h5").MarkupMatches("<h5>Hi Syncfusion, Nice to meet you :)</h5>"); ``` ** Note:** Before triggering the click event, the message is hidden. So, we cannot get the message’s markup.
3. Open the Test Explorer and run the test. ![Open the Test Explorer and run the test](https://www.syncfusion.com/blogs/wp-content/uploads/2020/07/Open-the-Test-Explorer-and-run-the-test.png)

The Click event test case has passed.

## Passing parameters to the component

bUnit has plenty of ways to pass parameters. Here, I am going to explain **non-Blazor** ** type parameters**.

1. Before passing parameters, you have to import Bunit.ComponentParameterFactory namespace.``` using static Bunit.ComponentParameterFactory; ```
2. Add a parameter and cascading value property as shown below:``` <button class="btn btn-primary" @onclick="ClickToShowParameters">Show Parameters</button> @if (ShowParameters) { <div class="parameter">Parameter: @Parameter</div> <div class="cascadingParameter">Cascading Parameter: @CascadingParameter</div> } @code { public bool ShowParameters { get; set; } = false; [Parameter] public int Parameter { get; set; } [CascadingParameter] public int CascadingParameter { get; set; } protected void ClickToShowParameters() { ShowParameters = true; } } ``` In the above code, we have set the property for the parameter and cascading parameter. ``` [Parameter] public int Parameter { get; set; } [CascadingParameter] public int CascadingParameter { get; set; } ``` Both properties are going to catch the parameter and cascading parameter when it is passed.The parameter and cascading parameter values are shown by clicking button. The **@**** onclick**=”ClickToShowParameters” event is going to perform this operation.
3. Add code in the test method as shown below.``` [Test] public void PassingParameters() { // Arrange using var context = new Bunit.TestContext(); int parameter = 1; int cascadingParameter = 2; // Act var cut = Context.RenderComponent<BlazorbUnit.HelloSyncfusion>(("Parameter", parameter), CascadingValue(cascadingParameter)); cut.FindAll("button")[1].Click(); // Assert cut.Find(".parameter").MarkupMatches("<div class='parameter'>Parameter: 1</div>"); cut.Find(".cascadingParameter").MarkupMatches("<div class='cascadingParameter'>Cascading Parameter: 2</td>"); } ``` In this code, var cut = context.RenderComponent<BlazorbUnit.HelloSyncfusion>((“Parameter”, parameter), CascadingValue(cascadingParameter)); is the way to pass a parameter. Here, “**Parameter**” is the property name of the parameter initialized in the Blazor component. Find the button using the ** FindAll** method and trigger the click event cut.FindAll(“button”)[1].Click();. Passed values will be shown in the Razor component, and then we can match the markup using following code. ``` cut.Find(".parameter").MarkupMatches("<div class='parameter'>Parameter: 1</div>"); cut.Find(".cascadingParameter").MarkupMatches("<div class='cascadingParameter'>Cascading Parameter: 2</td>"); ```
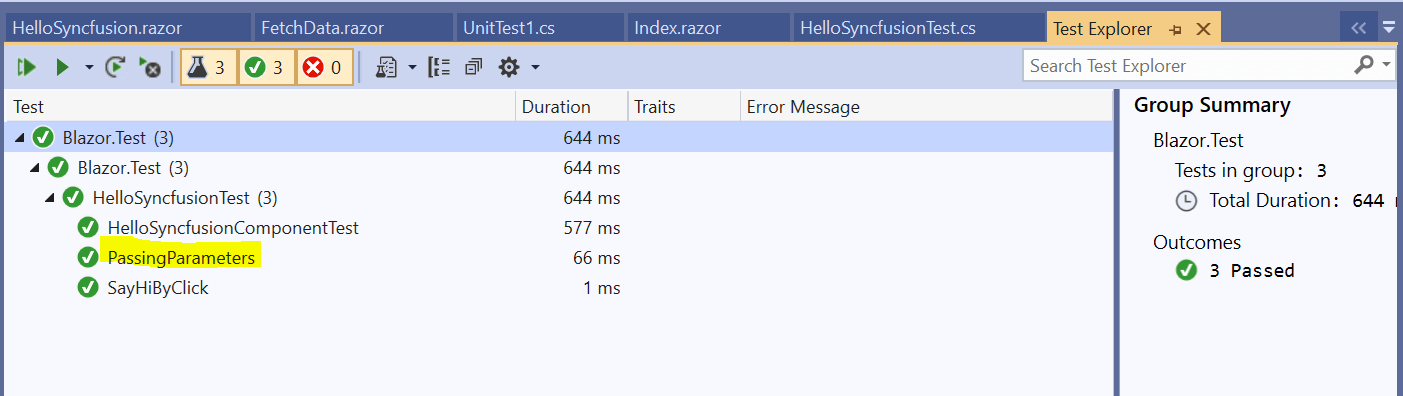
4. Open the Test Explorer and run the test case. ![Open the Test Explorer and run the test case](https://www.syncfusion.com/blogs/wp-content/uploads/2020/07/Open-the-Test-Explorer-and-run-the-test-case.png)
## Setup configuration

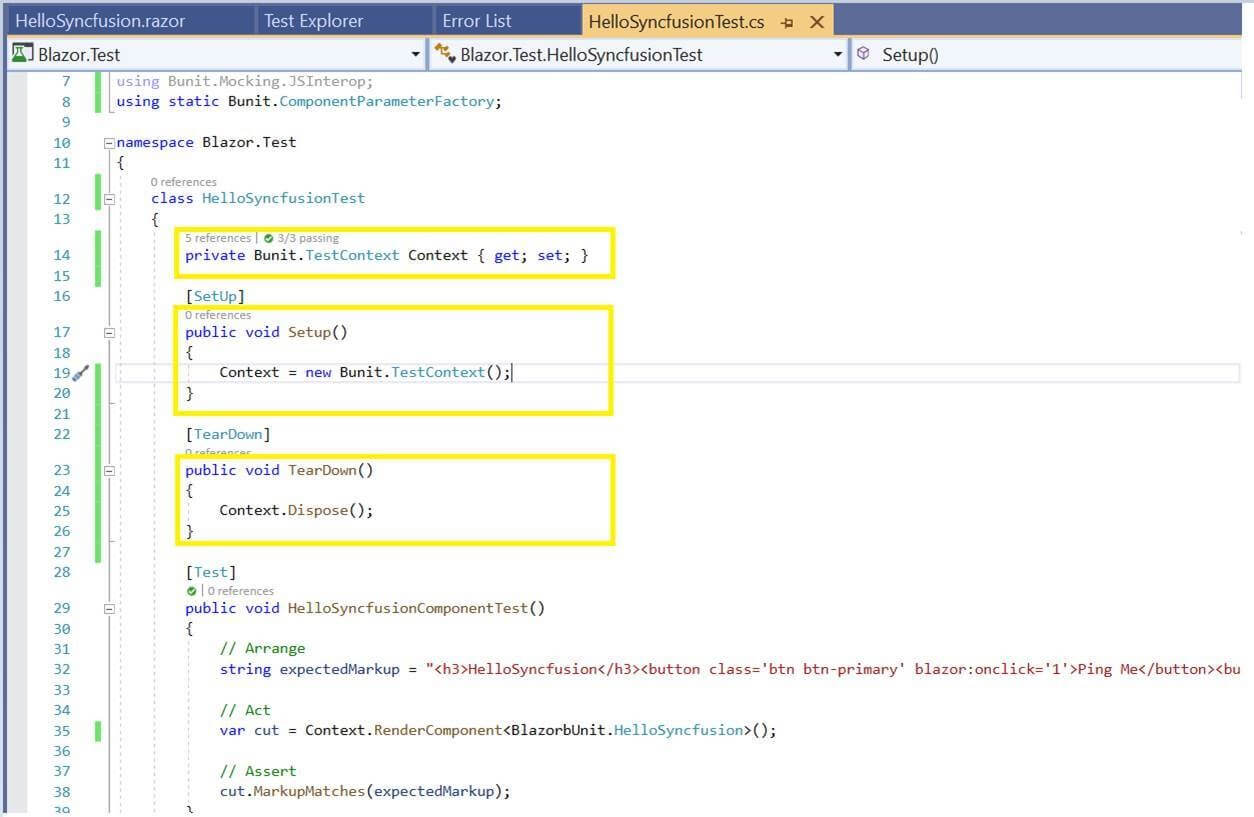
Here, we are going to configure a bUnit instance into a setup method. Once configured into the setup, you don’t need to create a new instance in every test method. Instead, you can use the common instance. Then add **Context.Dispose();** code into **TearDown** method to dispose context. Context will be disposed once each test run.  
 ![Setup Configuration of Blazor bUnit Testing](https://www.syncfusion.com/blogs/wp-content/uploads/2020/07/Setup-Configuration-of-bUnit-Testing.jpg)

Here, **bUnit TestContext** instance code was removed in each test method and instantiated in the setup method.

## Injecting services

Injecting a service is essential if you are using a service in your Blazor component. Let me explain how to inject services in a test method:

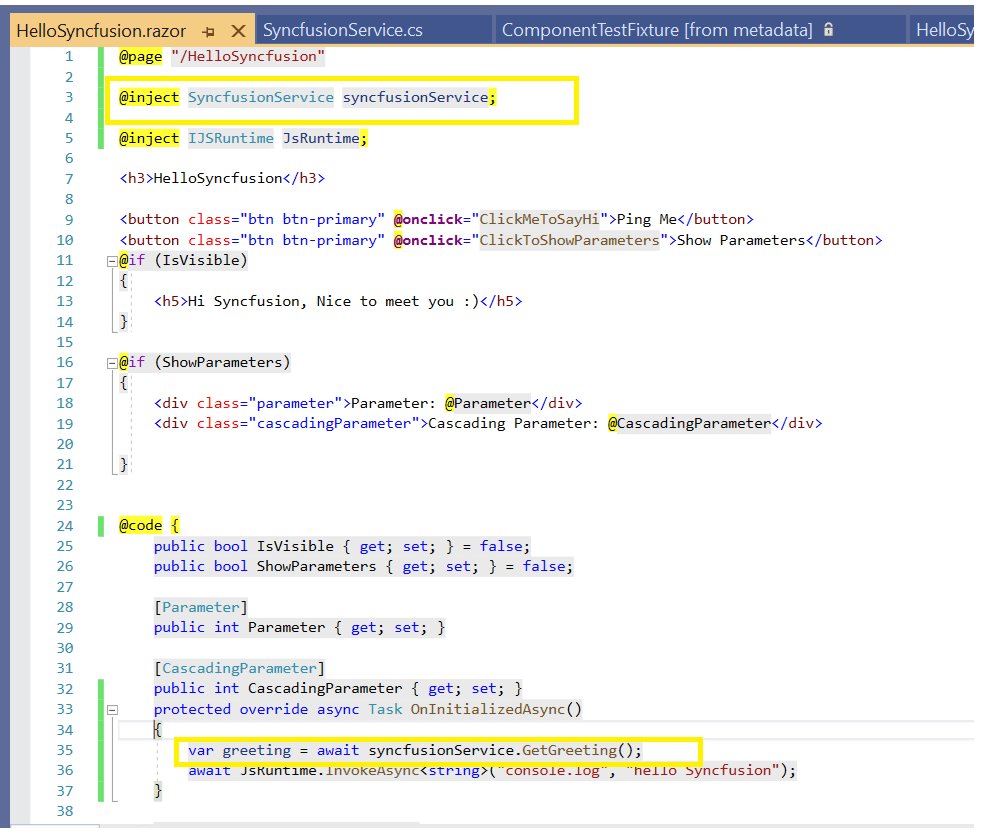
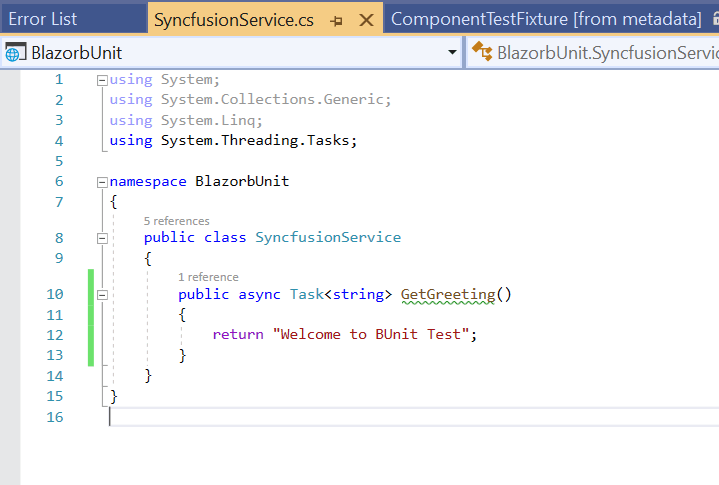
1. Consider a service named **SyncfusionService** in a Blazor project. We will then inject the service into the component like in the following screenshots. ![Code to inject SyncfusionService into Blazor component](https://www.syncfusion.com/blogs/wp-content/uploads/2020/07/Code-to-inject-SyncfusionService-into-Blazor-component.png) ![Resultant Code after injecting SyncfusionService into Blazor component](https://www.syncfusion.com/blogs/wp-content/uploads/2020/07/Resultant-Code-after-injecting-SyncfusionServise-into-Blazor-component.png)
2. Then, we must inject the service in the test method too, like the following screenshot.Here is the code to mock the service.``` Context.Services.AddSingleton<BlazorbUnit.SyncfusionService>(new BlazorbUnit.SyncfusionService()); ``` ![Code to inject SyncfusionService in the test method](https://www.syncfusion.com/blogs/wp-content/uploads/2020/07/Code-to-inject-SyncfusionService-in-the-test-method.png)
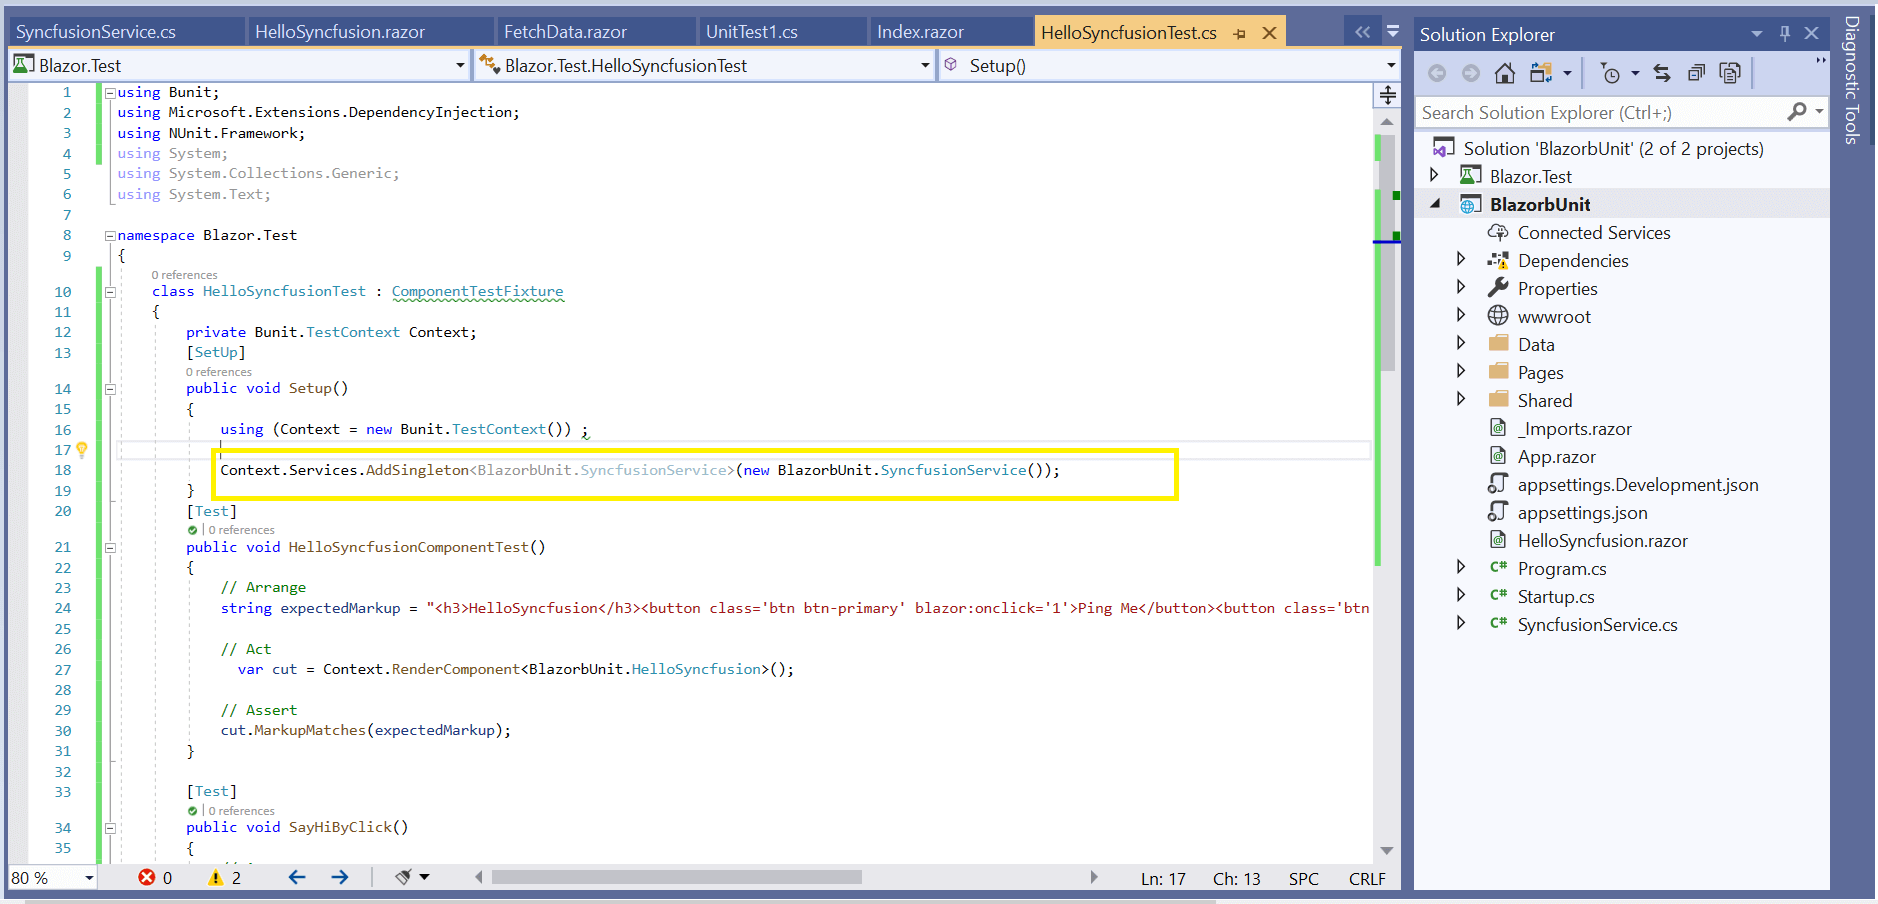
## Mocking IJSRuntime

A mock object allows copying or cloning the behavior of a class and interface. This is used when interacting with test cases.

Follow these steps to mock IJSRuntime:

1. Mocking **IJSRuntime** is essential If you are injecting ** IJSRuntime** in a Blazor component. Consider a scenario where you have used ** IJSRuntime** in the ** HelloSyncfusion.**** razor** component. ![Code to use IJSRuntime in the HelloSyncfusion.razor component](https://www.syncfusion.com/blogs/wp-content/uploads/2020/07/Code-to-use-IJSRuntime-in-the-HelloSyncfusion.razor-component.png)
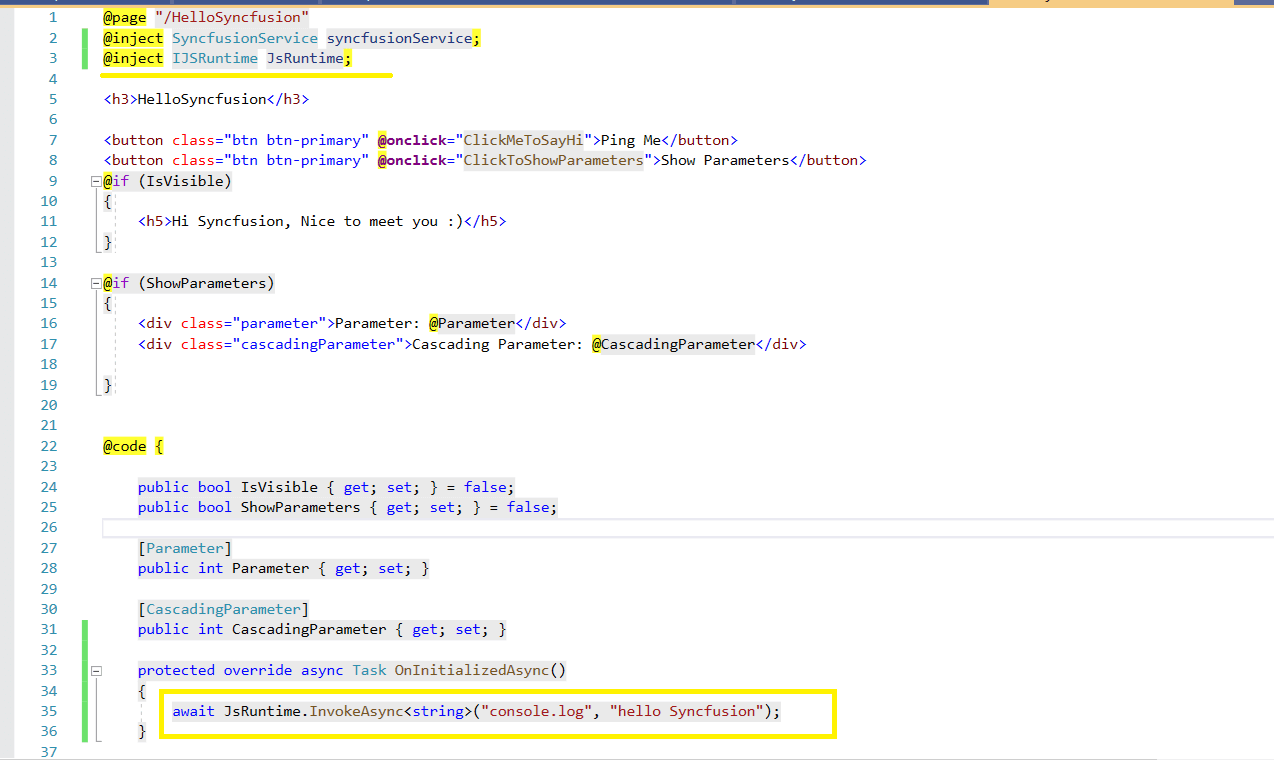
2. Add the namespaces, **using**** Microsoft.**** Extensions.DependencyInjection**and ** using Bunit.TestDoubles.JSInterop** before mocking ** IJSRuntime** in the test class.
3. Add **Context.**** Services.AddMockJsRuntime();**into the setup method to mock IJSRuntime. ![Add Context.Services.AddMockJsRuntime(); into the setup method to mock IJSRuntime](https://www.syncfusion.com/blogs/wp-content/uploads/2020/07/Add-Context.Services.AddMockJsRuntime-into-the-setup-method-to-mock-IJSRuntime.png)
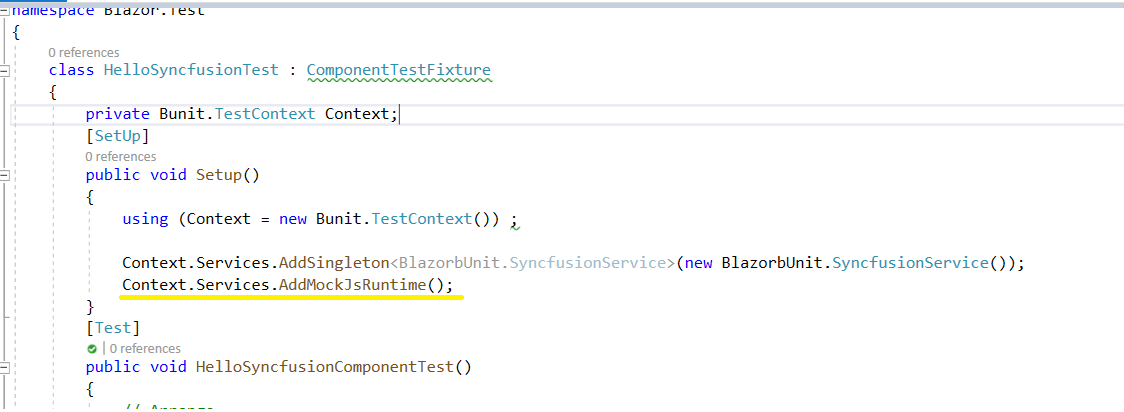
We can also mock other objects as needed.

## How to integrate with an Azure Pipeline

bUnit is built on a testing framework. So, there is no need to do separate configuration in an Azure Pipeline. If you have configured NUnit in an Azure pipeline, that is more than enough to put bUnit test cases into it.

Refer to this blog to learn how to configure an Azure Pipeline:


## bUnit Advantages

- Builds on top of traditional unit testing frameworks, so it doesn’t disturb existing unit test cases.
- Easy to integrate with an existing test project.
- Makes it easy to build a stable Blazor test bed.
- Provides more flexible ways to write test cases.

## bUnit Limitations

- Razor-based testing is not stable.
- Only a**beta**** version** of bUnit is currently available.

## Conclusion

In this blog post, we discussed the steps to create bUnit tests for Blazor components and how to integrate them in an Azure Pipeline. Try out these steps for yourself and leave your feedback in the comments section below.

For more details refer, [https://bUnit.egilhansen.com](https://bUnit.egilhansen.com)

Try our 65+ [Blazor UI components](https://www.syncfusion.com/blazor-components)
 by downloading the [free 30-day trial](https://www.syncfusion.com/account/manage-trials/downloads)
 or [NuGet](https://www.nuget.org/packages/Syncfusion.Blazor)
 package, and feel free to have a look at our [documentation](https://blazor.syncfusion.com/documentation/combobox/getting-started/)
, [GitHub](https://github.com/syncfusion/blazor-samples)
, and [online examples](https://blazor.syncfusion.com/demos/datagrid/overview/)
 to explore other available features.

You can also contact us through our [support forum](https://www.syncfusion.com/forums)
, [Direct-Trac](https://www.syncfusion.com/support/directtrac/)
, or [feedback portal](https://www.syncfusion.com/feedback/)
. As always, we would like to hear from you!