
In this blog, you will learn how to develop an audio recorder and player in .NET MAUI. The audio player will record and play audio files.
This application can be deployed and used on both Android and iOS.
Let’s get started!
Prerequisites
Tool: Visual Studio 2022
Supported Platform: Android and iOS
Supported OS: Android (7.0 and above) and iOS (v12 and above)
Developing audio recorder and player app
Step 1: Add required permissions in both platforms.
To record audio and save it in a device, the application will have to access the device’s audio input and storage. For that, we need to grant the following permissions:
- RECORD_AUDIO,
- READ_EXTERNAL_STORAGE
- WRITE_EXTERNAL_STORAGE
Note: In iOS, you can’t add storage permissions. It will always return Granted when checked and requested.
In Android, add the following code to the AndroidManifest.xml file.
<uses-permission android:name="android.permission.READ_EXTERNAL_STORAGE" />
<uses-permission android:name="android.permission.WRITE_EXTERNAL_STORAGE" />
<uses-permission android:name="android.permission.RECORD_AUDIO" />
In iOS, add the following code to the Info.plist file.
<key>NSMicrophoneUsageDescription</key>
 <string>The audio recorder app wants to use your microphone to record audio.</string>

Step 2: Create a service for recording and playing the audio.
There is no direct support for recording audio and playing it in .NET MAUI. So, we must create a service in the native platform for recording and playing the audio files.
Before creating a service class, create an interface for invoking the native methods.
Refer to the following code.
public interface IAudioPlayer
{
    void PlayAudio(string filePath);
    void Pause();
    void Stop();
    string GetCurrentPlayTime();
    bool CheckFinishedPlayingAudio();
}
public interface IRecordAudio
{
    void StartRecord();
    string StopRecord();
    void PauseRecord();
    void ResetRecord();
}
Then, create the service to record and play audio on both platforms.
Audio recorder service for Android
Reference the following methods and properties to create an audio recorder service for Android:
- Create an instance of MediaRecorder class, which will be used to record the audio.
- SetAudioSource(): Specify which hardware device to use to capture the audio input.
- SetOutputFile(): Specify the name of the output audio file.
- Prepare(): Initialize the audio recorder.
- Start(): Start recording the audio.
- Reset(): Discard the recorded audio and resets the recorder.
- Pause(): Pause the recording in the current running position.
- Resume(): Resume recording from the paused position.
- Stop(): Stop the audio recording.
Refer to the following code.
public class RecordAudio : IRecordAudio
{
   #region Fields
   private MediaRecorder mediaRecorder;
   private string storagePath;
   private bool isRecordStarted = false;
   #endregion
   #region Methods

   public void StartRecord()
   {
     if (mediaRecorder == null)
     {
         SetAudioFilePath();
         mediaRecorder = new MediaRecorder();
         mediaRecorder.Reset();
         mediaRecorder.SetAudioSource(AudioSource.Mic);
         mediaRecorder.SetOutputFormat(OutputFormat.AacAdts);
         mediaRecorder.SetAudioEncoder(AudioEncoder.Aac);
         mediaRecorder.SetOutputFile(storagePath);
         mediaRecorder.Prepare();
         mediaRecorder.Start();
     }
     else
     {
         mediaRecorder.Resume();
     }
     isRecordStarted = true;
   }
   public void PauseRecord()
   {
       if (mediaRecorder == null)
       {
           return;
        }
       mediaRecorder.Pause();
       isRecordStarted = false;
   }
   public void ResetRecord()
   {
      if (mediaRecorder != null)
      {
         mediaRecorder.Resume();
         mediaRecorder.Reset();
      }
      mediaRecorder = null;
      isRecordStarted = false;
   }
   public string StopRecord()
   {
      if (mediaRecorder == null)
      {
         return string.Empty;
      }
      mediaRecorder.Resume();
      mediaRecorder.Stop();
      mediaRecorder = null;
      isRecordStarted = false;
      return storagePath;
  }
  private void SetAudioFilePath()
  {
      string fileName = "/Record_" + DateTime.UtcNow.ToString("ddMMM_hhmmss") + ".mp3";
       var path = Environment.GetFolderPath(System.Environment.SpecialFolder.MyDocuments);
       storagePath = path + fileName;
       Directory.CreateDirectory(path);
  }
   #endregion
}
Audio recorder service for iOS
Now, we create the audio recorder service for the iOS platform using AVAudioRecorder:
- Initialize the audio session before trying to record.
- Specify the recording format and location in which to save the recording. The recording format is specified as an entry from NSDictionary with two NSObject arrays containing the keys and values of the format.
- Call the Record method when ready to initiate recording the audio.
- When finished recording, call the Stop() method on the recorder.
Refer to the following code.
public class RecordAudio : IRecordAudio
{
   AVAudioRecorder recorder;
   NSUrl url;
   NSError error;
   NSDictionary settings;
   string audioFilePath;
   public RecordAudio()
   {
      InitializeAudioSession();
   }
   private bool InitializeAudioSession()
   {
      var audioSession = AVAudioSession.SharedInstance();
      var err = audioSession.SetCategory(AVAudioSessionCategory.PlayAndRecord);
      if (err != null)
      {
         Console.WriteLine("audioSession: {0}", err);
          return false;
      }
      err = audioSession.SetActive(true);
      if (err != null)
      {
         Console.WriteLine("audioSession: {0}", err);
         return false;
      }
       return false;
    }
    public void PauseRecord()
    {
       recorder.Pause();
    }
    public void ResetRecord()
    {
       recorder.Dispose();
       recorder = null;
    }
    public void StartRecord()
    {
      if (recorder == null)
       {
          string fileName = "/Record_" + DateTime.UtcNow.ToString("ddMMM_hhmmss") + ".wav";
          var docuFolder = Environment.GetFolderPath(Environment.SpecialFolder.MyDocuments);
          audioFilePath = docuFolder + fileName;
          url = NSUrl.FromFilename(audioFilePath);
          NSObject[] values = new NSObject[]
          {
              NSNumber.FromFloat(44100.0f),
              NSNumber.FromInt32((int)AudioToolbox.AudioFormatType.LinearPCM),
              NSNumber.FromInt32(2),
              NSNumber.FromInt32(16),
              NSNumber.FromBoolean(false),
              NSNumber.FromBoolean(false)
          };
          NSObject[] key = new NSObject[]
          {
              AVAudioSettings.AVSampleRateKey,
              AVAudioSettings.AVFormatIDKey,
              AVAudioSettings.AVNumberOfChannelsKey,
              AVAudioSettings.AVLinearPCMBitDepthKey,
              AVAudioSettings.AVLinearPCMIsBigEndianKey,
              AVAudioSettings.AVLinearPCMIsFloatKey
          };
          settings = NSDictionary.FromObjectsAndKeys(values, key);
          recorder = AVAudioRecorder.Create(url, new AudioSettings(settings), out error);
          recorder.PrepareToRecord();
          recorder.Record();
      }
      else
      {
         recorder.Record();
      }
   }
   public string StopRecord()
   {
       if (recorder == null)
       {
          return string.Empty;
       }
       recorder.Stop();
       recorder = null;
       return audioFilePath;
  }
}
Now, let’s implement an audio player service for playing the recorded audio on both platforms.
Audio player service for Android
Follow these steps to create an audio-playing service for Android:
- Create an instance of the MediaPlayer class to play the audio file.
- Provide the file path of the audio file to the MediaPlayer instance through the SetDataSource method.
- After setting the data source, prepare the media player by calling the Prepare method.
- Once the media player is prepared, start playing the audio using the Start method.
Refer to the following code.
public class AudioPlayer  : IAudioPlayer
{
    #region Fields
    private MediaPlayer _mediaPlayer;
    private int currentPositionLength = 0;
    private bool isPrepared;
    private bool isCompleted;
    #endregion

    #region Methods
    public void PlayAudio(string filePath)
    {
      if (_mediaPlayer != null && !_mediaPlayer.IsPlaying)
      {
         _mediaPlayer.SeekTo(currentPositionLength);
         currentPositionLength = 0;
         _mediaPlayer.Start();
      }
      else if (_mediaPlayer == null || !_mediaPlayer.IsPlaying)
      {
         try
         {
            isCompleted = false;
            _mediaPlayer = new MediaPlayer();
            _mediaPlayer.SetDataSource(filePath);
            _mediaPlayer.SetAudioStreamType(Stream.Music);
            _mediaPlayer.PrepareAsync();
            _mediaPlayer.Prepared += (sender, args) =>
            {
               isPrepared = true;
               _mediaPlayer.Start();
            };
            _mediaPlayer.Completion += (sender, args) =>
            {
               isCompleted = true;
            };
         }
         catch (Exception e)
         {
            _mediaPlayer = null;
         }
      }
    }
    public void Pause()
    {
       if (_mediaPlayer != null && _mediaPlayer.IsPlaying)
       {
          _mediaPlayer.Pause();
          currentPositionLength = _mediaPlayer.CurrentPosition;
       }
    }
    public void Stop()
    {
      if (_mediaPlayer != null)
      {
         if (isPrepared)
         {
            _mediaPlayer.Stop();
           _mediaPlayer.Release();
           isPrepared = false;
         }
         isCompleted = false;
         _mediaPlayer = null;
      }
  }
  public string GetCurrentPlayTime()
  {
     if (_mediaPlayer != null)
     {
       var positionTimeSeconds =
       double.Parse(_mediaPlayer.CurrentPosition.ToString());
       positionTimeSeconds = positionTimeSeconds / 1000;
       TimeSpan currentTime = TimeSpan.FromSeconds(positionTimeSeconds);
       string currentPlayTime = string.Format("{0:mm\\:ss}", currentTime);
       return currentPlayTime;
     }
     return null;
  }
  public bool CheckFinishedPlayingAudio()
  {
     return isCompleted;
  }
  #endregion
}
Audio player service for iOS
Create an audio playing service in iOS using the AVPlayer class:
- Configure the audio file to play through the AVPlayerItem built-in class.
- Call the Play method to start the audio playing.
Refer to the following code.
public class AudioPlayer : IAudioPlayer
{
    AVPlayer _player;
    NSObject notificationHandle;
    NSUrl url;
    private bool isFinishedPlaying;
    private bool isPlaying;

    public bool IsPlaying
    {
       get { return isPlaying; }
       set
       {
          if (_player.Rate == 1 && _player.Error == null)
           isPlaying = true;
          else
           isPlaying = false;
       }
    }
    public AudioPlayer()
    {
       RegisterNotification();
    }
    ~AudioPlayer()
    {
      UnregisterNotification();
    }
    public void PlayAudio(string filePath)
    {
      isFinishedPlaying = false;
      if (_player == null)
      {
        url = NSUrl.FromString(filePath);
        AVPlayerItem avPlayerItem = new AVPlayerItem(URL);
        _player = new AVPlayer(avPlayerItem);
        _player.AutomaticallyWaitsToMinimizeStalling = false;
        _player.Volume = 1;
        _player.Play();
        IsPlaying = true;
        isFinishedPlaying = false;
      }
      else if (_player != null && !IsPlaying)
      {
         _player.Play();
         IsPlaying = true;
         isFinishedPlaying = false;
      }
   }
   public void Pause()
   {
     if (_player != null && IsPlaying)
     {
       _player.Pause();
       IsPlaying = false;
     }
   }
   public void Stop()
   {
     if (_player != null)
     {
       _player.Dispose();
       IsPlaying = false;
       _player = null;
     }
   }
   public string GetCurrentPlayTime()
   {
     if (_player != null)
     {
       var positionTimeSeconds = _player.CurrentTime.Seconds;
       TimeSpan currentTime = TimeSpan.FromSeconds(positionTimeSeconds);
       string currentPlayTime = string.Format("{0:mm\\:ss}", currentTime);
       return currentPlayTime;
     }
     return null;
   }
   public bool CheckFinishedPlayingAudio()
   {
     return isFinishedPlaying;
   }
   private void RegisterNotification()
   {
     notificationHandle = NSNotificationCenter.DefaultCenter.AddObserver(AVPlayerItem.DidPlayToEndTimeNotification, HandleNotification);
   }
   private void UnregisterNotification()
   {
      NSNotificationCenter.DefaultCenter.RemoveObserver(notificationHandle);
   }
   private void HandleNotification(NSNotification notification)
   {
      isFinishedPlaying = true;
      Stop();
   }
}Step 3: Creating a model.
Create a model class to show the recorded audio files in a list. Refer to the following code.
public class Audio : INotifyPropertyChanged
{
    #region Private
    private bool isPlayVisible;
    private bool isPauseVisible;
    private string currentAudioPostion;
    #endregion

    #region Constructor
    public Audio()
    {
       IsPlayVisible = true;
    }
    #endregion

    #region Properties
    public string AudioName { get; set; }
    public string AudioURL { get; set; }
    public string Caption { get; set; }
    public bool IsPlayVisible
    {
       get { return isPlayVisible; }
       set
       {
         isPlayVisible = value;
         OnPropertyChanged();
         IsPauseVisble = !value;
       }
    }
    public bool IsPauseVisble
    {
       get { return isPauseVisible; }
       set { isPauseVisible = value; OnPropertyChanged(); }
    }
    public string CurrentAudioPosition
    {
       get { return currentAudioPostion; }
       set
       {
          if (string.IsNullOrEmpty(currentAudioPostion))
          {
             currentAudioPostion = string.Format("{0:mm\\:ss}", new TimeSpan());
          }
          else
          {
             currentAudioPostion = value;
          }
          OnPropertyChanged();
      }
    }
    #endregion
}
In the code, the CurrentAudioPosition property helps us to display the playing audio time.
Step 4: Creating the UI.
We are going to create a simple UI for showing recorded audio files and for recording audio. For this, we will be using Syncfusion’s ListView for .NET MAUI. Install the .NET MAUI ListView NuGet package, and then include it in the application.
The following XAML code will display the recorded audio in Syncfusion’s .NET MAUI ListView control.
<syncfusion:SfListView
x:Name="AudioList"
Grid.Row="0"
Grid.ColumnSpan="2"
Margin="0,8"
IsVisible="true"
ItemsSource="{Binding Audios}"
SelectionMode="None">
<syncfusion:SfListView.ItemTemplate>
<DataTemplate>
<ViewCell>
<Grid
x:Name="PlayAudioGrid"
Margin="0,4,0,12"
BackgroundColor="Transparent"
HeightRequest="60">
<Grid.ColumnDefinitions>
<ColumnDefinition Width="50" />
<ColumnDefinition Width="*" />
<ColumnDefinition Width="50" />
<ColumnDefinition Width="80" />
</Grid.ColumnDefinitions>
<Button
Grid.Column="0"
Padding="0"
BackgroundColor="Transparent"
Command="{Binding Path=BindingContext.PlayAudioCommand, Source={x:Reference mainPage}}"
CommandParameter="{Binding .}"
FontFamily="AudioIconFonts"
FontSize="22"
IsVisible="{Binding IsPlayVisible}"
Text=""
TextColor="Black" />
<Button
Grid.Column="0"
Padding="0"
BackgroundColor="Transparent"
BorderColor="LightGray"
Command="{Binding Path=BindingContext.PauseAudioCommand, Source={x:Reference mainPage}}"
CommandParameter="{Binding .}"
FontFamily="AudioIconFonts"
FontSize="22"
IsVisible="{Binding IsPauseVisble}"
Text=""
TextColor="Black" />
<Label
Grid.Column="1"
FontSize="14"
Text="{Binding AudioName}"
TextColor="Black"
VerticalTextAlignment="Center" />
<Label
Grid.Column="2"
Margin="0,0,12,0"
FontSize="14"
IsVisible="{Binding IsPauseVisble}"
Text="{Binding CurrentAudioPosition}"
TextColor="Black"
VerticalTextAlignment="Center" />
<Button
Grid.Column="3"
BackgroundColor="Transparent"
Command="{Binding Path=BindingContext.DeleteCommand, Source={x:Reference mainPage}}"
CommandParameter="{Binding}"
FontFamily="AudioIconFonts"
FontSize="20"
Text=""
TextColor="Red" />
</Grid>
</ViewCell>
</DataTemplate>
</syncfusion:SfListView.ItemTemplate>
</syncfusion:SfListView>The following XAML code is used to design the UI for recording audio.
<!-- Timer Label -->
<StackLayout
Grid.Row="2"
Grid.ColumnSpan="2"
Margin="0,0,0,32"
VerticalOptions="End">
<Label
FontSize="14"
HorizontalTextAlignment="Center"
IsVisible="{Binding IsRecordingAudio}"
Text="Recording…"
TextColor="#7D898F" />
<Label
FontSize="60"
HorizontalTextAlignment="Center"
IsVisible="{Binding IsRecordingAudio}"
Text="{Binding TimerLabel}"
TextColor="Black" />
</StackLayout>
<!-- Button Setup -->
<Grid
Grid.Row="3"
Grid.ColumnSpan="2"
ColumnSpacing="60">
<Grid.ColumnDefinitions>
<ColumnDefinition Width="*" />
<ColumnDefinition Width="*" />
<ColumnDefinition Width="*" />
</Grid.ColumnDefinitions>
<!-- Retry -->
<Grid Grid.Column="0" RowDefinitions="auto,auto">
<Button
Grid.Row="0"
BackgroundColor="LightGray"
BorderColor="#5F49FF"
BorderWidth="1"
Command="{Binding ResetCommand}"
CornerRadius="25"
FontFamily="AudioIconFonts"
FontSize="22"
HeightRequest="50"
IsEnabled="{Binding IsRecordingAudio}"
Text=""
TextColor="#5F49FF"
WidthRequest="50">
<Button.Triggers>
<DataTrigger
Binding="{Binding IsRecordingAudio}"
TargetType="Button"
Value="False">
<Setter Property="TextColor" Value="Gray" />
<Setter Property="BorderColor" Value="Gray" />
</DataTrigger>
</Button.Triggers>
</Button>
<Label
Grid.Row="1"
HorizontalOptions="Center"
Text="Retry" />
</Grid>
<!-- Play -->
<Grid
Grid.Column="1"
HorizontalOptions="CenterAndExpand"
RowDefinitions="auto,auto">
<!-- Record Button -->
<Button
Grid.Row="0"
BackgroundColor="Red"
BorderColor="Red"
BorderWidth="1"
Command="{Binding RecordCommand}"
CornerRadius="25"
FontFamily="AudioIconFonts"
FontSize="22"
HeightRequest="50"
IsVisible="{Binding IsRecordButtonVisible}"
Text=""
TextColor="White"
WidthRequest="50" />
<Label
Grid.Row="1"
HorizontalOptions="Center"
IsVisible="{Binding IsRecordButtonVisible}"
Text="Record" />
<!-- Pause Button -->
<Button
Grid.Row="0"
BackgroundColor="Green"
BorderColor="Green"
BorderWidth="1"
Command="{Binding PauseCommand}"
CornerRadius="25"
FontFamily="AudioIconFonts"
FontSize="22"
HeightRequest="50"
IsVisible="{Binding IsPauseButtonVisible}"
Text=""
TextColor="White"
WidthRequest="50" />
<Label
Grid.Row="1"
HorizontalOptions="Center"
IsVisible="{Binding IsPauseButtonVisible}"
Text="Pause" />
<!-- Resume Button -->
<Button
Grid.Row="0"
BackgroundColor="Red"
BorderColor="Red"
BorderWidth="1"
Command="{Binding RecordCommand}"
CornerRadius="25"
FontFamily="AudioIconFonts"
FontSize="22"
HeightRequest="50"
IsVisible="{Binding IsResumeButtonVisible}"
Text=""
TextColor="White"
WidthRequest="50" />
<Label
Grid.Row="1"
HorizontalOptions="Center"
IsVisible="{Binding IsResumeButtonVisible}"
Text="Resume" />
</Grid>
<!-- Stop -->
<Grid Grid.Column="2" RowDefinitions="auto,auto">
<Button
Grid.Row="0"
BackgroundColor="LightGray"
BorderColor="#5F49FF"
BorderWidth="1"
Command="{Binding StopCommand}"
CornerRadius="25"
FontFamily="AudioIconFonts"
FontSize="22"
HeightRequest="50"
IsEnabled="{Binding IsRecordingAudio}"
Text=""
TextColor="#5F49FF"
WidthRequest="50">
<Button.Triggers>
<DataTrigger
Binding="{Binding IsRecordingAudio}"
TargetType="Button"
Value="False">
<Setter Property="TextColor" Value="Gray" />
<Setter Property="BorderColor" Value="Gray" />
</DataTrigger>
</Button.Triggers>
</Button>
<Label
Grid.Row="1"
HorizontalOptions="Center"
Text="Stop" />
</Grid>
</Grid>Step 5: Register dependency injection to access the objects in the constructor.
Dependency injection is a way in which an object (client) receives other objects (services) that depend on it. To learn more about using dependency injection in .NET MAUI, refer to the blog Learn How to Use Dependency Injection in .NET MAUI.
Refer to the following code to register the dependency injection services. First, we must add the necessary services. Then, we can directly access the objects in the desired class constructors. Therefore, we can access the AudioPlayerService and RecordAudioService objects in the ViewModel.
public static MauiApp CreateMauiApp()
{
    var builder = MauiApp.CreateBuilder();
    builder
         .UseMauiApp<App>()
         .ConfigureFonts(fonts =>
         {
	     fonts.AddFont("OpenSans-Regular.ttf", "OpenSansRegular");
	     fonts.AddFont("OpenSans-Semibold.ttf", "OpenSansSemibold");
             fonts.AddFont("AudioIconFonts.ttf", "AudioIconFonts");
         });
     #if ANDROID || IOS
        builder.Services.AddTransient<IAudioPlayerService, AudioPlayerService>();
        builder.Services.AddTransient<IRecordAudioService, RecordAudioService>();
     #endif
        builder.Services.AddTransient<MainPage>();
        builder.Services.AddTransient<AppShell>();
        builder.ConfigureSyncfusionListView();
        return builder.Build();
}Step 6: Creating a ViewModel.
We have followed the MVVM (model-view-viewmodel) structure to develop this application. So, we need to create a ViewModel (MainPageViewModel.cs) file for recording and playing audio. In the ViewModel, we generate an audio collection to bind the data for recorded audio.
Properties in ViewModel class
- recordTime, playTimer: The timer properties used in the UI when we play or record an audio.
- IsRecordingAudio: Controls the visibility of the reset and stop options.
- IsPauseButtonVisible: Controls the visibility of the Pause button in the UI.
- IsRecordButtonVisible: Controls the visibility of the Record button.
- IsResumeButtonVisible: Controls the visibility of the Resume button.
- audios: The collection of all the recorded audio files to be displayed in a list view.
- recordAudioService, audioPlayerService: These interface properties invoke the native platform-specific code.
The following code examples demonstrate the audio recorder.
Use the following code to initiate the recorder. We must invoke the dependency service method recordAudio.StartRecord() to start the recorder.
Note: Only if the permissions are granted can we start the recorder.
private async void StartRecording()
{
    if (!IsRecordingAudio)
    {
       var permissionStatus = await RequestandCheckPermission();
       if (permissionStatus == PermissionStatus.Granted)
       {
          IsRecordingAudio = true;
          IsPauseButtonVisible = true;
          recordAudio.StartRecord();
          IsRecordButtonVisible = false;
          isRecord = true;
          timerValue = new TimeSpan(0, 0, -1);
          recordTimer.Start();
       }
       else
       {
          IsRecordingAudio = false;
          IsPauseButtonVisible = false;
       }
   }
   else
   {
      ResumeRecording();
   }
}
Pause the recorder using the recordAudio.PauseRecord() platform-specific method.
private void PauseRecording()
{
    isRecord = false;
    IsPauseButtonVisible = false;
    IsResumeButtonVisible = true;
    recordAudio.PauseRecord();
}
The following method is used to continue the recording from a paused position.
private void ResumeRecording()
{
   recordAudio.StartRecord();
   IsResumeButtonVisible = false;
   IsPauseButtonVisible = true;
   isRecord = true;
}
Use the following code to reset the recorder and start it from the initial position. Use the platform-specific code recordAudio.ResetRecord() to reset the recorder.
private void ResetRecording()
{
   recordAudio.ResetRecord();
   timerValue = new TimeSpan();
   TimerLabel = string.Format("{0:mm\\:ss}", timerValue);
   IsRecordingAudio = false;
   IsPauseButtonVisible = false;
   IsResumeButtonVisible = false;
   StartRecording();
}
To stop the recorder, use the platform-specific code recordAudio.StopRecord().
private async void StopRecording()
{
   IsPauseButtonVisible = false;
   IsResumeButtonVisible = false;
   IsRecordingAudio = false;
   IsRecordButtonVisible = true;
   timerValue = new TimeSpan();
   recordTimer.Stop();
   RecentAudioFilePath = recordAudio.StopRecord();
   await App.Current.MainPage.DisplayAlert("Alert", "Audio has been recorded", "Ok");
   TimerLabel = string.Format("{0:mm\\:ss}", timerValue);
   SendRecording();
}
private void SendRecording()
{
   Audio recordedFile = new Audio() { AudioURL = RecentAudioFilePath };
   if (recordedFile != null)
   {
      recordedFile.AudioName = Path.GetFileName(RecentAudioFilePath);
      Audios.Insert(0, recordedFile);
   }
}
The following code is used to get permission to record
public async Task<PermissionStatus> RequestandCheckPermission()
{
    PermissionStatus status = await Permissions.CheckStatusAsync<Permissions.StorageWrite>();
    if (status != PermissionStatus.Granted)
        await Permissions.RequestAsync<Permissions.StorageWrite>();

    status = await Permissions.CheckStatusAsync<Permissions.Microphone>();
    if (status != PermissionStatus.Granted)
        await Permissions.RequestAsync<Permissions.Microphone>();
              PermissionStatus storagePermission = await Permissions.CheckStatusAsync<Permissions.StorageWrite>();
              PermissionStatus microPhonePermission = await Permissions.CheckStatusAsync<Permissions.Microphone>();
              if (storagePermission == PermissionStatus.Granted && microPhonePermission == PermissionStatus.Granted)
              {
                  return PermissionStatus.Granted;
              }
    return PermissionStatus.Denied;
}
The following code examples demonstrate the audio player.
We invoke the platform-specific method audioPlayer.PlayAudio(audioFilePath) to play the audio.
private void StartPlayingAudio(object obj)
{
   if (audioFile != null && audioFile != (Audio)obj)
   {
       AudioFile.IsPlayVisible = true;
       StopAudio();
   }
   if (obj is Audio)
   {
       audioFile = (Audio)obj;
       audioFile.IsPlayVisible = false;
       string audioFilePath = AudioFile.AudioURL;
       audioPlayer.PlayAudio(audioFilePath);
       SetCurrentAudioPosition();
   }
}
Use the following method to pause the audio using the platform-specific method audioPlayer.Pause().
private void PauseAudio(object obj)
{
   if (obj is Audio)
   {
      var audiophile = (Audio)obj;
      audioFile.IsPlayVisible = true;
      audioPlayer.Pause();
   }
}
Using the method audioPlayer.Stop() to stop the audio in the following code.
public void StopAudio()
{
   if (AudioFile != null)
   {
      audioPlayer.Stop();
      playTimer.Stop();
   }
}Use the following code to get the current position of the audio and display it in the UI.
private void SetCurrentAudioPosition()
{
   playTimer.Interval = new TimeSpan(0, 0, 0, 0, 250);
   playTimer.Tick += (s, e) =>
   {
     if (AudioFile != null)
     {
        AudioFile.CurrentAudioPosition = audioPlayer.GetCurrentPlayTime();
        bool isAudioCompleted = audioPlayer.CheckFinishedPlayingAudio();
   	if (isAudioCompleted)
        {
           AudioFile.IsPlayVisible = true;
           playTimer.Stop();
        }
     }
  };
  playTimer.Start();
}
Output
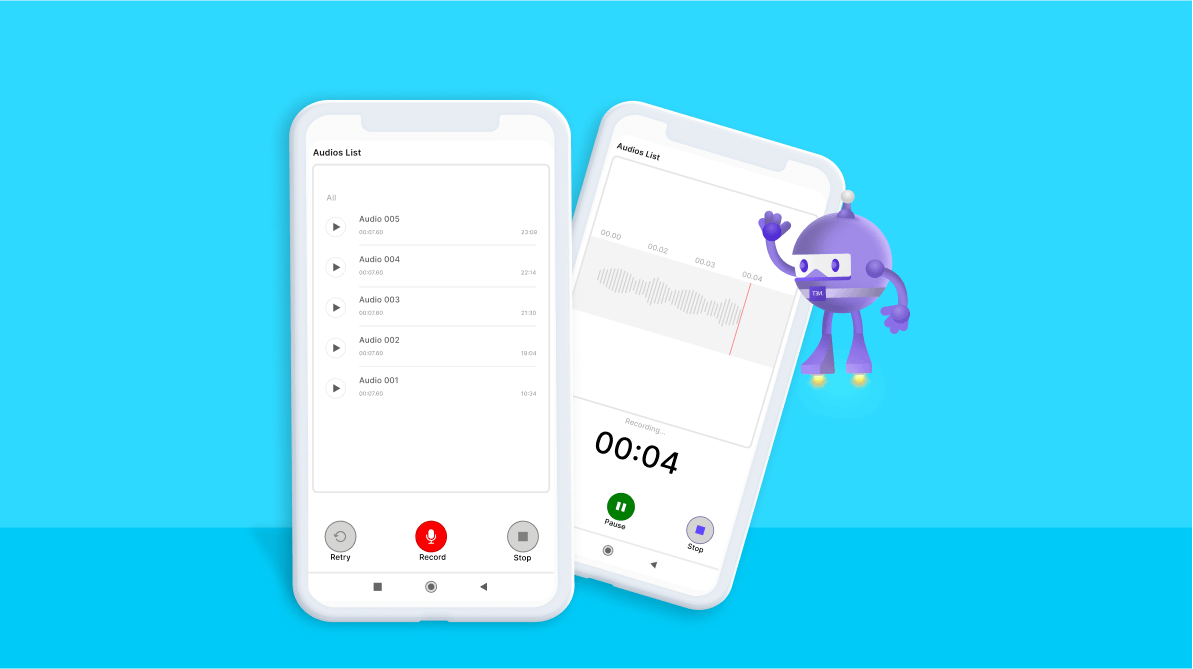
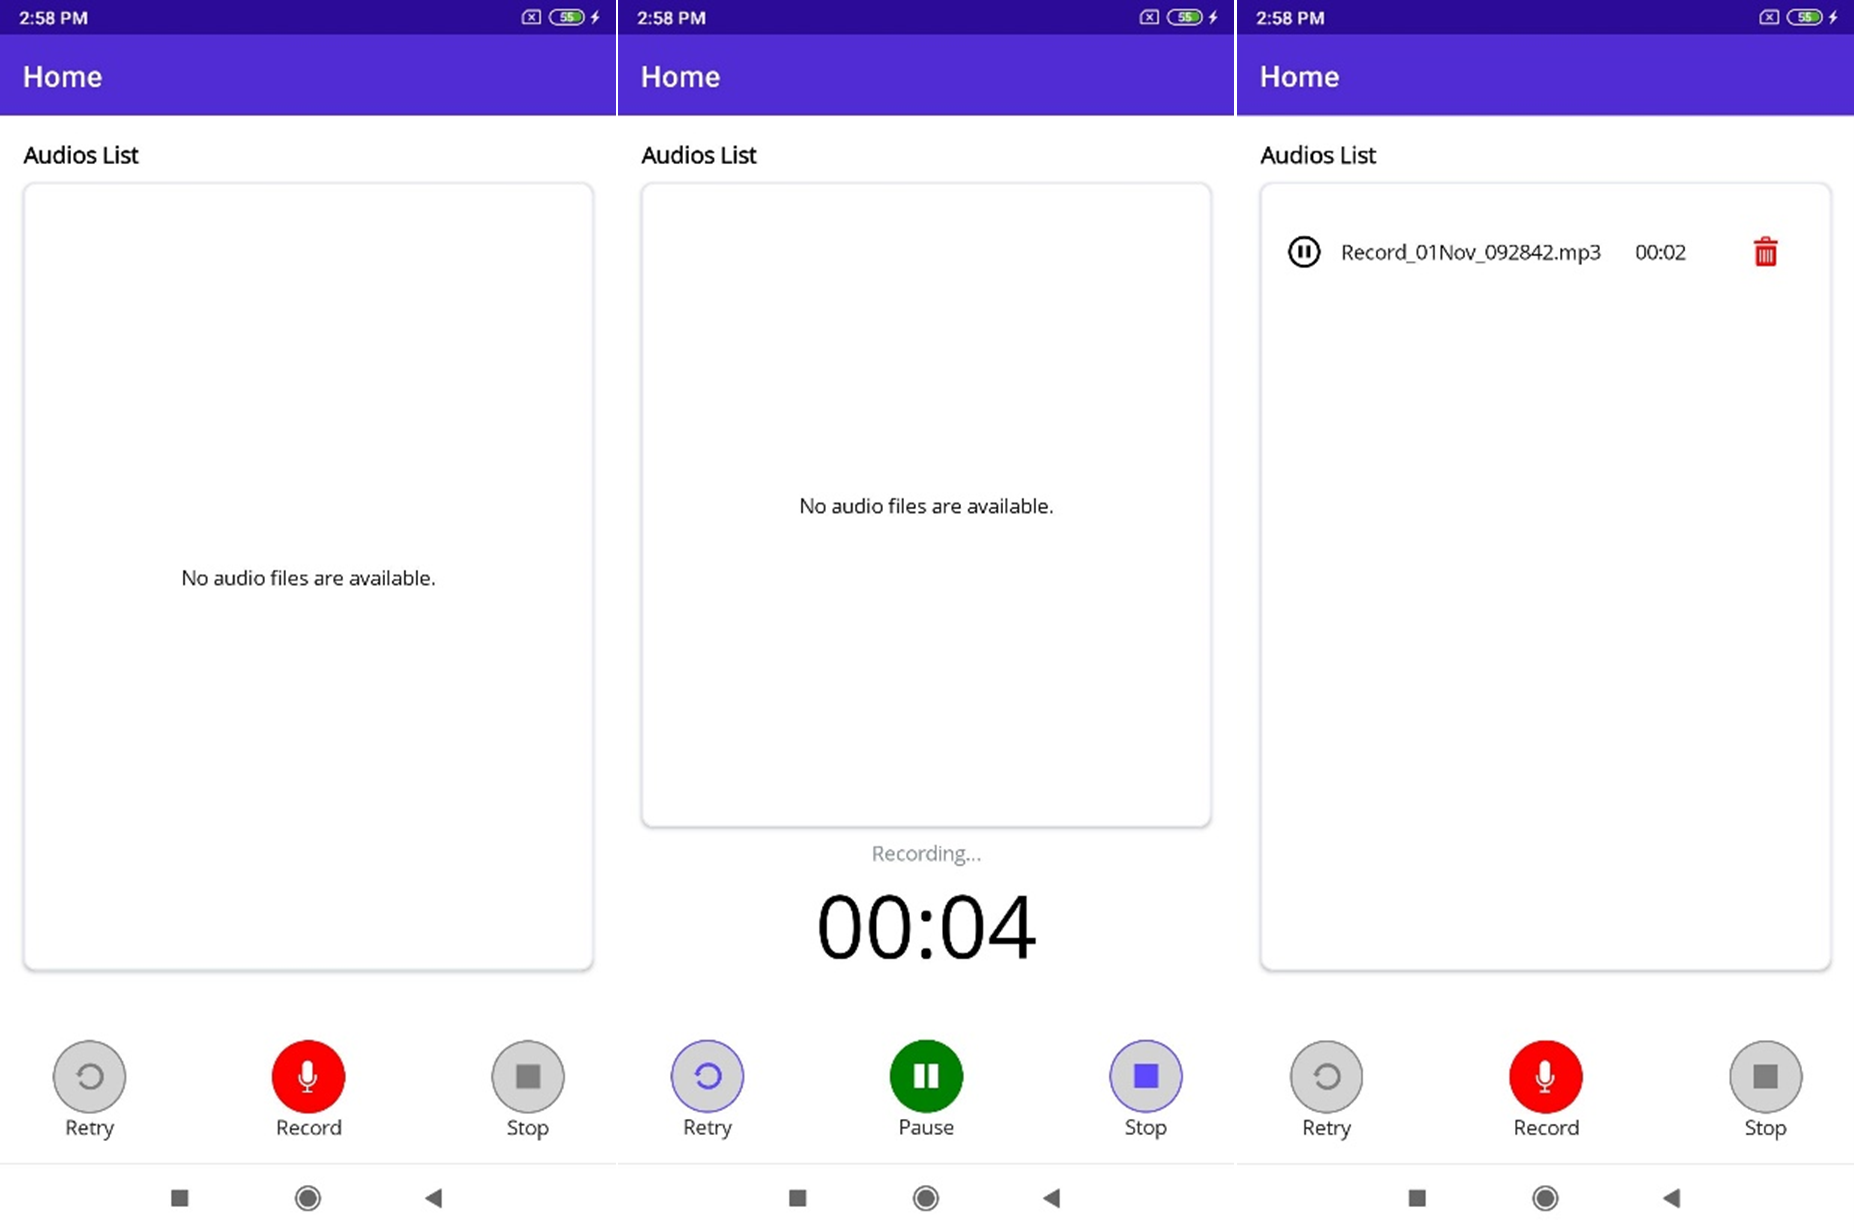
The following is a screenshot of the application.
Resources
For more details, refer to the GitHub project .NET MAUI Audio Recorder and Player.
Conclusion
I hope you now have a clear idea of how to develop a .NET MAUI application to record and play audio files in your Android and iOS phones. Try the project sample and share your feedback in the comments section below.
Syncfusion’s .NET MAUI controls were built from scratch using .NET MAUI, so they feel like framework controls. They are fine-tuned to work with a huge volume of data. Use them to build better cross-platform mobile and desktop apps!
For current customers, the new Essential Studio® version is available for download from the License and Downloads page. If you are not yet a Syncfusion customer, you can always download our free evaluation to see all our controls in action.
For questions, you can contact us through our support forum, support portal, or feedback portal. We are always happy to assist you!
Reference


Comments (3)
Does this solution only work with .Net 6? Can it be upgraded to .Net 7
The current code base will throw errors. I got it to work by using a generic ListView. Nothing wrong with Syncfusion, I’m sure, but until there is an official fix to the codebase for this demo, replace your Main.xaml with the following below….
there is no code below
Comments are closed.