---
title: "Build Faster with Blazor HTML Editor: Template Insertion Made Easy"
published_at: "2025-08-29T11:49:25+00:00"
modified_at: "2025-08-29T11:49:29+00:00"
url: "https://www.syncfusion.com/blogs/post/blazor-html-editor-template-insertion"
excerpt: "Discover how to enhance productivity in HTML Editor by inserting predefined templates like signatures, agendas, and financial tables. Learn how to implement a custom toolbar dropdown for fast, consistent content creation in Blazor apps."
taxonomy_category:
  - "Blazor"
  - "Blazor Components"
  - "HTML Editor"
  - "Productivity Tools"
  - "Rich Text Editing"
  - "Rich Text Editor"
  - "Web Development"
taxonomy_post_tag:
  - "Blazor Content Editor"
  - "Blazor HTML Editor"
  - "Custom Toolbar in HTML Editor"
  - "html editor"
  - "Insert HTML Content"
  - "Predefined Templates"
  - "Productivity Tools for Developers"
  - "Syncfusion Rich Text Editor"
  - "Template Insertion Blazor"
  - "WYSIWYG Editor Blazor"
---

# Build Faster with Blazor HTML Editor: Template Insertion Made Easy

[Saravanan G](https://www.syncfusion.com/blogs/author/saravanang)

![Build Faster with Blazor HTML Editor Template Insertion Made Easy](https://www.syncfusion.com/blogs/wp-content/uploads/2025/08/Build-Faster-with-Blazor-HTML-Editor-Template-Insertion-Made-Easy-1.jpg)


**TL;DR:** Want to streamline content creation in your Blazor app? This guide shows how to use Syncfusion’s HTML Editor to insert predefined templates like company letterheads, meeting agendas, and invoices at the cursor position. Boost productivity and ensure consistency with just a few lines of code

Developers often waste time recreating standard content structures. With [Syncfusion’s Blazor Rich Text Editor](https://www.syncfusion.com/blazor-components/blazor-rich-text-editor)
, you can insert predefined templates like signatures, agendas, balance sheet, and invoices at the cursor position with a single click. This guide shows you how to implement it and boost productivity instantly.

Whether you’re building a **CRM**, ** CMS**, or ** internal tool**, this HTML Editor helps you deliver polished content faster. It saves time, ensures consistency, and enhances productivity, making it an ideal solution for teams that need reliable, reusable content structures.

## Prerequisites

To get started, ensure you have the following installed:

- [Visual Studio 2022](https://visualstudio.microsoft.com/vs/)
- [.NET Core 6.0 and above](https://dotnet.microsoft.com/en-us/download/dotnet/6.0)

## Step-by-step guide

## Step 1: Create a Blazor Web app application

First, create a new Blazor Web App application using Visual Studio and install Syncfusion® Blazor packages and configure the style and script reference, followed by [getting started document](https://blazor.syncfusion.com/documentation/rich-text-editor/getting-started-webapp)
.

## Step 2: Set up the Blazor Rich Text Editor

Now, place the following code in the **Index.razor** page to add the Blazor Rich Text Editor component.

```
<SfRichTextEditor Width="100%">
    <RichTextEditorToolbarSettings Items="@Tools"/>
</SfRichTextEditor>
```

In this code, we’ve added a Rich Text Editor with a toolbar containing standard commands (**Bold**,** Italic**, ** Underline**, and ** CreateTable**).

## Step 3: Define the custom toolbar tool with a DropDown Button

To add a custom dropdown button to the toolbar, use the `RichTextEditorCustomToolbarItems` property to define the custom tool. The dropdown will use the Syncfusion® **DropDownButton** component, which provides a clean and customizable menu experience.

```
<SfRichTextEditor>
    <RichTextEditorToolbarSettings Items="@Tools">
        <RichTextEditorCustomToolbarItems>
            <RichTextEditorCustomToolbarItem Name="Templates">
                <Template>
                    <SfDropDownButton Content="Templates" Items="@TemplateItems" Select="OnTemplateSelect" />
                </Template>
            </RichTextEditorCustomToolbarItem>
        </RichTextEditorCustomToolbarItems>
    </RichTextEditorToolbarSettings>
</SfRichTextEditor>

@code {
    private List<ToolbarItemModel> Tools = new List<ToolbarItemModel>()
    {
        new ToolbarItemModel { Command = ToolbarCommand.Bold },
        new ToolbarItemModel { Command = ToolbarCommand.Italic },
        new ToolbarItemModel { Command = ToolbarCommand.Underline },
        new ToolbarItemModel { Command = ToolbarCommand.CreateTable },
        new ToolbarItemModel { Name = "Templates" } // Reference the custom tool
    };

    private List<DropDownButtonItemModel> TemplateItems = new List<DropDownButtonItemModel>()
    {
        new DropDownButtonItemModel { Text = "Signature (multi-line)", Id = "Signature" },
        new DropDownButtonItemModel { Text = "Projections table", Id = "Projections" },
        new DropDownButtonItemModel { Text = "Balance Sheet", Id = "BalanceSheet" },
        new DropDownButtonItemModel { Text = "Company Letterhead", Id = "Letterhead" },
        new DropDownButtonItemModel { Text = "Meeting Agenda", Id = "Agenda" }
    };

    private async Task OnTemplateSelect(MenuEventArgs<DropDownButtonItemModel> args)
    {
        // Template insertion logic will go here
    }
}
```

The `Select` event is linked to the `OnTemplateSelect` method, which handles inserting the corresponding template at the cursor position when a menu item is clicked, while the Tools list includes a `ToolbarItemModel` with `Name = "Templates"` to ensure the custom tool is rendered in the toolbar.

## Step 4: Define the predefined templates

Next, define the HTML content for each template. These templates will be inserted into the editor when selected. For simplicity, we’ll store them in a dictionary, mapping each template’s ID to its HTML content.

```
private Dictionary<string, string> Templates = new Dictionary<string, string>
{
    {
        "Signature",
        "<p>Best regards,<br/>John Doe<br/>Senior Manager<br/>XYZ Corporation<br/>[email protected]</p>"
    },
    {
        "Projections",
        "<table border='1' style='width:100%; border-collapse: collapse;'>" +
            "<tr><th>Quarter</th><th>Revenue</th><th>Expenses</th></tr>" +
            "<tr><td>Q1</td><td>$100,000</td><td>$80,000</td></tr>" +
            "<tr><td>Q2</td><td>$120,000</td><td>$90,000</td></tr>" +
        "</table>"
    },
    {
        "BalanceSheet",
        "<table border='1' style='width:100%; border-collapse: collapse;'>" +
            "<tr><th>Assets</th><th>Amount</th></tr>" +
            "<tr><td>Cash</td><td>$50,000</td></tr>" +
            "<tr><td>Inventory</td><td>$30,000</td></tr>" +
            "<tr><th>Liabilities</th><th>Amount</th></tr>" +
            "<tr><td>Debt</td><td>$20,000</td></tr>" +
        "</table>"
    },
    {
        "Letterhead",
        "<div style='text-align:center;'>" +
            "<h2>XYZ Corporation</h2>" +
            "<p>123 Business Ave, Suite 100<br/>New York, NY 10001<br/>www.xyzcorp.com</p>" +
            "<hr/>" +
        "</div>"
    },
    {
        "Agenda",
        "<h3>Meeting Agenda</h3>" +
            "<ol>" +
                "<li>Welcome and Introductions</li>" +
                "<li>Review of Previous Minutes</li>" +
                "<li>New Business</li>" +
                "<li>Action Items</li>" +
            "</ol>"
    }
};
```

## Step 5: Insert the template at the cursor position

Now, let’s implement the `OnTemplateSelect`method to insert the selected template at the editor’s cursor position. The Rich Text Editor provides a `ExecuteCommandAsync` method to insert HTML content dynamically.

```
private async Task OnTemplateSelect(MenuEventArgs<DropDownButtonItemModel> args)
{
    if (Templates.ContainsKey(args.Item.Id))
    {
        string templateContent = Templates[args.Item.Id];
        await RteObj.ExecuteCommandAsync(RichTextEditorCommand.InsertHTML, templateContent);
        await RteObj.FocusAsync(); // Return focus to the editor
    }
}
```

The `ExecuteCommandAsync` method with `RichTextEditorCommand.InsertHTML` inserts the HTML string at the cursor position.

### Complete code sample

For reference, here’s the complete `Index.razor` code with all steps combined:

```
@using Syncfusion.Blazor.RichTextEditor
@using Syncfusion.Blazor.SplitButtons

<SfRichTextEditor @ref="RteObj" Width="100%">
    <RichTextEditorToolbarSettings Items="@Tools">
        <RichTextEditorCustomToolbarItems>
            <RichTextEditorCustomToolbarItem Name="Templates">
                <Template>
                    <SfDropDownButton IconCss="e-icons e-add-notes" CssClass="e-tbar-btn e-rte-dropdown-btn" Items="@TemplateItems">
                        <ChildContent>
                            <DropDownButtonEvents ItemSelected="OnTemplateSelect"></DropDownButtonEvents>
                        </ChildContent>
                    </SfDropDownButton>
                </Template>
            </RichTextEditorCustomToolbarItem>
        </RichTextEditorCustomToolbarItems>
    </RichTextEditorToolbarSettings>
</SfRichTextEditor>

@code {
    private SfRichTextEditor RteObj;

    private List<ToolbarItemModel> Tools = new List<ToolbarItemModel>
    {
        new ToolbarItemModel { Command = ToolbarCommand.Bold },
        new ToolbarItemModel { Command = ToolbarCommand.Italic },
        new ToolbarItemModel { Command = ToolbarCommand.FontName },
        new ToolbarItemModel { Command = ToolbarCommand.FontSize },
        new ToolbarItemModel { Command = ToolbarCommand.Separator },
        new ToolbarItemModel { Command = ToolbarCommand.CreateLink },
        new ToolbarItemModel { Command = ToolbarCommand.Image },
        new ToolbarItemModel { Command = ToolbarCommand.CreateTable },
        new ToolbarItemModel { Name = "Templates", TooltipText = "Insert Template" },
        new ToolbarItemModel { Command = ToolbarCommand.Separator },
        new ToolbarItemModel { Command = ToolbarCommand.Formats },
        new ToolbarItemModel { Command = ToolbarCommand.Alignments },
        new ToolbarItemModel { Command = ToolbarCommand.Separator },
        new ToolbarItemModel { Command = ToolbarCommand.Undo },
        new ToolbarItemModel { Command = ToolbarCommand.Redo }
    };

    private List<DropDownMenuItem> TemplateItems = new List<DropDownMenuItem>
    {
        new DropDownMenuItem { Text = "Company Letterhead", Id = "Letterhead" },
        new DropDownMenuItem { Text = "Meeting Agenda", Id = "Agenda" },
        new DropDownMenuItem { Text = "Projections table", Id = "Projections" },
        new DropDownMenuItem { Text = "Balance Sheet", Id = "BalanceSheet" },
        new DropDownMenuItem { Text = "Invoice", Id = "Invoice" },
        new DropDownMenuItem { Text = "Project Timeline", Id = "Timeline" },
        new DropDownMenuItem { Text = "Action Plan", Id = "ActionPlan" },
        new DropDownMenuItem { Text = "FAQ Section", Id = "FAQ" },
        new DropDownMenuItem { Text = "Signature", Id = "Signature" },
        new DropDownMenuItem { Text = "Symbols", Id = "Symbols" }
    };

    private Dictionary<string, string> Templates = new Dictionary<string, string>
    {
        {
            "Signature",
            "<p>Best regards,<br>" +
                "<span style='font-size: 14pt;'>" +
                    "<span style='font-family: Verdana, Geneva, sans-serif;'><strong>John Doe</strong></span>" +
                "</span><br>" +
                "<em>Senior Manager</em><br>" +
                "<strong>XYZ Corporation</strong> | <a href='mailto:[email protected]'>[email protected]</a>" +
            "</p>"
        },
        {
            "Projections",
            "<table style='width: 75%;' class='e-rte-table'>" +
                "<tr><th>Quarter</th><th>Revenue</th><th>Expenses</th></tr>" +
                "<tr><td>Q1</td><td>$100,000</td><td>$80,000</td></tr>" +
                "<tr><td>Q2</td><td>$120,000</td><td>$90,000</td></tr>" +
            "</table>"
        },
        {
            "BalanceSheet",
            "<table style='width: 75%;' class='e-rte-table'>" +
                "<tr><th>Assets</th><th>Amount</th></tr>" +
                "<tr><td>Cash</td><td>$50,000</td></tr>" +
                "<tr><td>Inventory</td><td>$30,000</td></tr>" +
                "<tr><th>Liabilities</th><th>Amount</th></tr>" +
                "<tr><td>Debt</td><td>$20,000</td></tr>" +
            "</table>"
        },
        {
            "Letterhead",
            "<div style='text-align:center;'>" +
                "<h2>XYZ Corporation</h2>" +
                "<p>123 Business Ave, Suite 100<br>" +
                    "New York, NY 10001<br>" +
                    "<a href='https://www.xyzcorp.com' target='_blank'>www.xyzcorp.com</a>" +
                "</p>" +
                "<hr/>" +
            "</div><br/>"
        },
        {
            "Agenda",
            "<h3>Meeting Agenda</h3>" +
                "<ol>" +
                    "<li>Welcome and Introductions</li>" +
                    "<li>Review of Previous Minutes</li>" +
                    "<li>New Business</li>" +
                    "<li>Action Items</li>" +
                "</ol>"
        },
        {
            "FAQ",
            "<h3>Frequently Asked Questions</h3>" +
                "<p><strong>Q: What is your return policy?</strong><br>" +
                    "A: Returns are accepted within 30 days with a receipt.</p>" +
                "<p><strong>Q: Do you offer bulk discounts?</strong><br>" +
                    "A: Yes, contact sales for details.</p>"
        },
        {
            "Timeline",
            "<table style='width: 75%;' class='e-rte-table'>" +
                "<tr><th>Milestone</th><th>Date</th><th>Status</th></tr>" +
                "<tr><td>Project Kickoff</td><td>2025-05-01</td><td>Completed</td></tr>" +
                "<tr><td>Phase 1 Delivery</td><td>2025-06-15</td><td>In Progress</td></tr>" +
            "</table>"
        },
        {
            "ActionPlan",
            "<h3>Action Plan</h3>" +
                "<ul>" +
                    "<li><strong>Task 1</strong>: Finalize budget - Assigned to: Finance Team - Due: 2025-04-30</li>" +
                    "<li><strong>Task 2</strong>: Launch marketing campaign - Assigned to: Marketing Team - Due: 2025-05-15</li>" +
                "</ul>"
        },
        {
            "Invoice",
            "<table style='width: 75%;' class='e-rte-table'>" +
                "<tr><th>Item</th><th>Description</th><th>Quantity</th><th>Price</th></tr>" +
                "<tr><td>Item 1</td><td>Consulting Services</td><td>10</td><td>$100</td></tr>" +
                "<tr><td>Item 2</td><td>Software License</td><td>1</td><td>$500</td></tr>" +
                "<tr><th colspan='3'>Total</th><td>$1,500</td></tr>" +
            "</table>"
        },
        {
            "Symbols",
            "<p>HTML Symbols: < (less than) and > (greater than)</p>"
        }
    };

    private async Task OnTemplateSelect(MenuEventArgs args)
    {
        if (Templates.ContainsKey(args.Item.Id))
        {
            string templateContent = Templates[args.Item.Id];
            await RteObj.ExecuteCommandAsync(CommandName.InsertHTML, templateContent);
            await RteObj.FocusAsync();
        }
    }
}
```

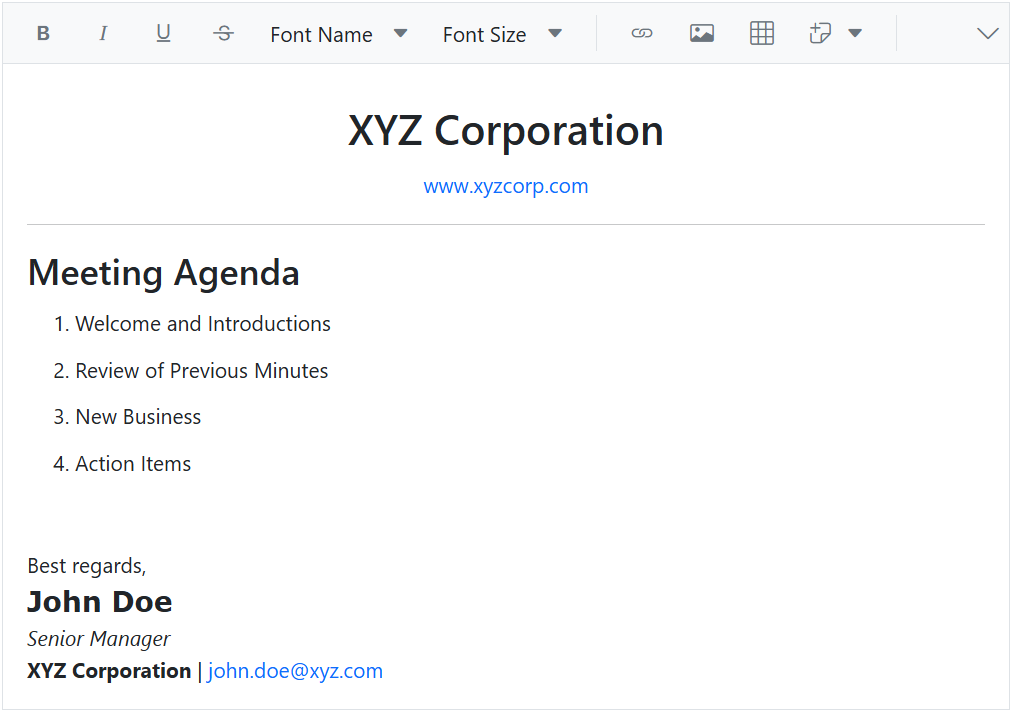
After implementing the above steps, here’s what you can expect when using the Rich Text Editor:
![Predefined template insertion in Blazor Rich HTML Editor](https://www.syncfusion.com/blogs/wp-content/uploads/2025/08/image001-4.png)

Predefined template insertion in Blazor HTML Editor

## References

You can download the complete source code of this example from the [GitHub](https://github.com/SyncfusionExamples/blazor-richtexteditor-templates)
 repository and refer to our comprehensive [document](https://blazor.syncfusion.com/documentation/rich-text-editor/getting-started-webapp)
 with Blazor Data Form Component documentation and [demos](https://blazor.syncfusion.com/demos/rich-text-editor/overview?theme=fluent2)
.

### Why Syncfusion® for your Blazor Projects?

- Trusted by thousands of enterprise developers.
- Fast integration with rich documentation and demos.
- Dedicated support to help you build faster.


## Conclusion

With just a few steps, we’ve extended the [Syncfusion® Blazor Rich Text Editor](https://www.syncfusion.com/blazor-components/blazor-rich-text-editor)
 to include a custom dropdown toolbar tool that inserts predefined templates at the cursor position.

This feature isn’t just about convenience, it’s about delivering consistent, professional content across your organization. Whether you’re building enterprise-grade apps or internal tools, Syncfusion’s Blazor Rich Text Editor helps teams stay productive and aligned.

Predefined template insertion is just one of many productivity features in Syncfusion’s Blazor Rich Text Editor. Explore our full suite of components to build faster, smarter, and more consistent applications. Your next great app starts here.

Install our Blazor component by adding [NuGet package](https://www.nuget.org/packages/Syncfusion.Blazor)
 to your project. Check out our [online examples](https://blazor.syncfusion.com/)
 and [documentation](https://blazor.syncfusion.com/documentation/introduction/)
 to discover a wide range of features.

If you’re already a Syncfusion® user, you can download the latest version of Essential Studio® from the [license and downloads](https://www.syncfusion.com/account/downloads)
 page. New to Syncfusion® Start your journey with a 30-day [free trial](https://www.syncfusion.com/downloads)
 and explore over 1,900 UI components, including powerful charting tools for Blazor.

If you need assistance, please do not hesitate to contact us via our [support forum](https://www.syncfusion.com/forums)
, [support portal](https://support.syncfusion.com/)
, or [feedback portal](https://www.syncfusion.com/feedback)
. We are always eager to help you!

## Related Blogs


[Create Visually Rich Content Easily with Blazor Rich Text Editor! No HTML](https://www.syncfusion.com/blogs/post/blazor-rich-text-editor-no-html)


[Discover the Best Blazor Rich Text Editor for Effortless Content Creation](https://www.syncfusion.com/blogs/post/best-blazor-rich-text-editor)


[Step-by-Step Guide: Adding Mail Merge to Blazor Rich Text Editor](https://www.syncfusion.com/blogs/post/mail-merge-in-blazor-rich-text-editor)


[Seamlessly Import and Export in Blazor Rich Text Editor](https://www.syncfusion.com/blogs/post/import-export-blazor-rich-text-editor)
