---
title: "How to Add Custom Search to Angular Pivot Table Using Label Filtering"
published_at: "2025-05-21T17:22:46+00:00"
modified_at: "2025-05-21T17:22:51+00:00"
url: "https://www.syncfusion.com/blogs/post/angular-pivot-table-label-filtering"
excerpt: "Build a custom search feature in the Angular Pivot Table using label filtering, dynamic fields, and RxJS debouncing for enhanced performance."
taxonomy_category:
- "Angular"
- "Data Visualization"
- "Filtering"
- "Performance Optimization"
- "Pivot Table"
taxonomy_post_tag:
- "Angular"
- "Custom Filtering"
- "Data Visualization"
- "Filtering data"
- "JavaScript"
- "Label Filtering"
- "Pivot Table"
- "Pivot View"
---
# How to Add Custom Search to Angular Pivot Table Using Label Filtering
[Sridhar Karunakaran](https://www.syncfusion.com/blogs/author/sridhar-karunakaran)

**TL;DR:** This guide walks you through adding a custom search box to the Syncfusion® Angular Pivot Table in an Angular 18 project. It starts with built-in label filtering as a base, then explains how to set up the environment, integrate sample data, and dynamically filter fields using user input. To improve performance, it also demonstrates how to implement RxJS debouncing for efficient updates.
Data visualization is a key part of modern web apps, helping users make sense of complex datasets with ease. The [Syncfusion® Angular Pivot Table](https://www.syncfusion.com/angular-components/angular-pivot-table)
is a powerful tool for summarizing and analyzing relational data, equipped with features like [filtering](https://ej2.syncfusion.com/angular/documentation/pivotview/filtering)
, [sorting](https://ej2.syncfusion.com/angular/documentation/pivotview/sorting)
, and [aggregation](https://ej2.syncfusion.com/angular/documentation/pivotview/aggregation)
.
In this guide, you’ll enhance its functionality by building a custom search feature using the [filterSettings](https://ej2.syncfusion.com/angular/documentation/api/pivotview/dataSourceSettingsModel/#filtersettings)
property with [label filtering](https://ej2.syncfusion.com/angular/documentation/pivotview/filtering#label-filtering)
. We’ll use Angular 18’s standalone components and walk through each step from setting up the project to integrating the Pivot Table, binding sample data, and implementing a responsive search interface.
## Understanding the existing filtering functionality in the Pivot Table
Before diving into customizations, let’s first explore the built-in [filtering](https://ej2.syncfusion.com/angular/documentation/pivotview/filtering)
options available in the [Pivot Table](https://ej2.syncfusion.com/angular/documentation/pivotview/getting-started)
. These features form the foundation for our custom search implementation:
- [Member filtering](https://ej2.syncfusion.com/angular/documentation/pivotview/filtering#member-filtering) : Enabled via [allowMemberFilter](https://ej2.syncfusion.com/angular/documentation/api/pivotview/dataSourceSettings/#allowmemberfilter) property in [dataSourceSettings](https://ej2.syncfusion.com/angular/documentation/api/pivotview/dataSourceSettings/) , this option lets users include or exclude specific items from a field such as selecting specific countries. It’s accessible through the UI’s filter dialog, which includes a search bar for quickly locating members.
- [Label filtering](https://ej2.syncfusion.com/angular/documentation/pivotview/filtering#label-filtering) : This filters data based on text patterns in row or column headers. For example, you can display only items with labels that contain **United**. It’s enabled by setting [allowLabelFilter](https://ej2.syncfusion.com/angular/documentation/api/pivotview/dataSourceSettings/#allowlabelfilter) to ** true** and configured via [filterSettings](https://ej2.syncfusion.com/angular/documentation/api/pivotview/dataSourceSettingsModel/#filtersettings) property. This is the start of our custom search today.
- [Value filtering](https://ej2.syncfusion.com/angular/documentation/pivotview/filtering#value-filtering) : Enabled with [allowValueFilter](https://ej2.syncfusion.com/angular/documentation/api/pivotview/dataSourceSettings/#allowvaluefilter) , this filters data based on aggregated values such as totals that exceed a certain threshold. While powerful, it is not the focus of this guide.
These filtering options are typically configured through the Pivot Table’s interactive UI. However, the [filterSettings](https://ej2.syncfusion.com/angular/documentation/api/pivotview/dataSourceSettingsModel/#filtersettings)
property allows programmatic control, perfect for a custom search feature that filters data dynamically based on user input.
## Why custom search with label filtering?
The default filter dialog is ideal for ad-hoc [filtering](https://ej2.syncfusion.com/angular/documentation/pivotview/filtering)
, but a custom search offers a streamlined user experience. By using [label filtering](https://ej2.syncfusion.com/angular/documentation/pivotview/filtering#label-filtering)
, we can predefine or dynamically set text-based criteria such as **Contains**, or ** Begin With** to display only matching data.
This guide will demonstrate how to implement a search input to the Pivot Table, filtering the **Country** field in real-time using standard Angular techniques.
## Setting up the Angular 18 environment
Angular 18 uses standalone components by default, so we’ll skip the traditional **NgModule** setup. Here’s how to get started.
1. **Install Angular CLI.**``` npm install -g @angular/cli ```
2. **Create a new Angular 18 project.**``` ng new syncfusion-pivot-search --standalone --skip-tests cd syncfusion-pivot-search ```
3. **Install the Syncfusion® PivotView package.**``` npm install @syncfusion/ej2-angular-pivotview –save ```
Since we’re using standalone components, we’ll import the Syncfusion® modules directly into the component.
## Implementing custom search with label filtering
### Step 1: Prepare sample data
Create a **data.ts** file in ** src/app** directory and add the following sample data to populate the Pivot Table.
**data.ts**
```
export const pivotData = [
{ Sold: 31, Amount: 52824, Country: 'France', Products: 'Mountain Bikes', Year: 'FY 2015', Quarter: 'Q1' },
{ Sold: 51, Amount: 86904, Country: 'France', Products: 'Road Bikes', Year: 'FY 2015', Quarter: 'Q2' },
{ Sold: 90, Amount: 153360, Country: 'United States', Products: 'Touring Bikes', Year: 'FY 2016', Quarter: 'Q3' },
{ Sold: 25, Amount: 42600, Country: 'United Kingdom', Products: 'Mountain Bikes', Year: 'FY 2016', Quarter: 'Q4' },
{ Sold: 27, Amount: 46008, Country: 'United States', Products: 'Road Bikes', Year: 'FY 2017', Quarter: 'Q1' }
];
```
This dataset reflects a typical structure used in real-world scenarios, with fields like Country, Products, and Year to configure the Pivot Table.
If you’re new to setting up the Syncfusion® Pivot Table, the [user guide](https://ej2.syncfusion.com/angular/documentation/pivotview/getting-started)
document is an excellent resource. It walks you through integrating the Pivot Table into an Angular project, including how to bind data, configure [rows](https://ej2.syncfusion.com/angular/documentation/api/pivotview/dataSourceSettings/#rows)
, [columns](https://ej2.syncfusion.com/angular/documentation/api/pivotview/dataSourceSettings/#columns)
, and [values](https://ej2.syncfusion.com/angular/documentation/api/pivotview/dataSourceSettings/#values)
, and enable features like [filtering](https://ej2.syncfusion.com/angular/documentation/pivotview/filtering)
.
For this guide, we’ve simplified the dataset to focus specifically on [label filtering](https://ej2.syncfusion.com/angular/documentation/pivotview/filtering#label-filtering)
. However, the user guide document also provides deeper insights into data source options such as binding to **JSON**, ** remote data**, or ** OLAP** cubes and additional configuration settings that you can explore later.
### Step 2: Update the Standalone component
We will replace the contents of **app.component.ts** with the following.
```
import { Component, ViewChild } from '@angular/core';
import {
PivotViewComponent,
IDataOptions,
PivotViewAllModule,
PivotFieldListAllModule,
Operators
} from '@syncfusion/ej2-angular-pivotview';
import { FormsModule } from '@angular/forms'; // Required for ngModel
import { pivotData } from './data';
@Component({
selector: 'app-root',
standalone: true,
imports: [PivotViewAllModule, PivotFieldListAllModule, FormsModule],
templateUrl: './app.component.html',
styleUrls: ['./app.component.css']
})
export class AppComponent {
@ViewChild('pivotview') pivotview!: PivotViewComponent;
public selectedField: string = 'Country';
public condition: Operators = 'Contains';
public searchTerm: string = '';
public dataSourceSettings: IDataOptions = {
dataSource: pivotData,
expandAll: false,
allowLabelFilter: true,
columns: [
{ name: 'Year', caption: 'Production Year' },
{ name: 'Quarter' }
],
rows: [
{ name: 'Country' },
{ name: 'Products' }
],
values: [
{ name: 'Sold', caption: 'Units Sold' },
{ name: 'Amount', caption: 'Sold Amount' }
],
filters: [],
filterSettings: []
};
// Apply search filter directly to the Pivot Table's dataSourceSettings
applySearch(): void {
if (this.searchTerm.trim()) {
this.pivotview.dataSourceSettings.filterSettings = [{
name: this.selectedField,
type: 'Label',
condition: this.condition,
value1: this.searchTerm
}];
} else {
this.pivotview.dataSourceSettings.filterSettings = [];
}
}
}
```
**Note:** We’ve added **FormsModule** to the imports array to support **[(ngModel)]**, as it is not included by default in standalone components. The ** applySearch** method updates the Pivot Table’s [dataSourceSettings](https://ej2.syncfusion.com/angular/documentation/api/pivotview/dataSourceSettings/)
directly via the **pivotview** reference, ensuring efficient label-based [filtering](https://ej2.syncfusion.com/angular/documentation/pivotview/filtering)
.
### Step 3: Design the UI
Update **app.component.html** to include a reference for the **** element.
```
Custom Search in Syncfusion Pivot Table
```
### Step 4: Add basic styling
In this section, we’ll apply some simple styling to enhance the visual appearance of our application. These styles will enhance readability and create a more user-friendly interface.
***CSS Styling***
Create or update the **app.component.css** file with the following styles:
```
h2 {
font-family: Arial, sans-serif;
color: #333;
}
input {
border: 1px solid #ccc;
border-radius: 4px;
font-size: 14px;
}
```
### Step 5: Reference Pivot Table styles
To ensure the Pivot Table renders with its intended look and feel, you need to include the [Syncfusion® Essential JS2 styles](https://www.syncfusion.com/code-examples/ej2-custom-styles)
. These CSS files provide layout, typography, and interactive elements like the filter dialog.
As recommended in the [user guide](https://ej2.syncfusion.com/angular/documentation/pivotview/getting-started#adding-styles)
, you can add a pre-built theme by importing it into your project. For this example, we’ll use the Material theme.
Install the EJ2 styles package:
```
npm install @syncfusion/ej2 --save
```
Then, update **angular.json** to include the Material theme CSS in the styles array under ** architect.build.options.**
```
"styles": [
"node_modules/@syncfusion/ej2/material.css",
"src/styles.css"
],
```
Alternatively, you can import the styles directly in **styles.css** or ** styles.scss** if you’re using SCSS:
```
@import '@syncfusion/ej2/material.css';
```
The **Material** theme provides a clean, modern appearance, but Syncfusion® offers other options like ** Bootstrap**, ** Fabric**, or ** Tailwind CSS**. For more theme details, refer to the user guide document’s [adding styles](https://ej2.syncfusion.com/angular/documentation/pivotview/getting-started#adding-styles)
section.
### Step 6: Test the implementation
To run the app, use the following command.
```
ng serve
```
Then, open your browser and navigate to [http://localhost:4200](http://localhost:4200/)
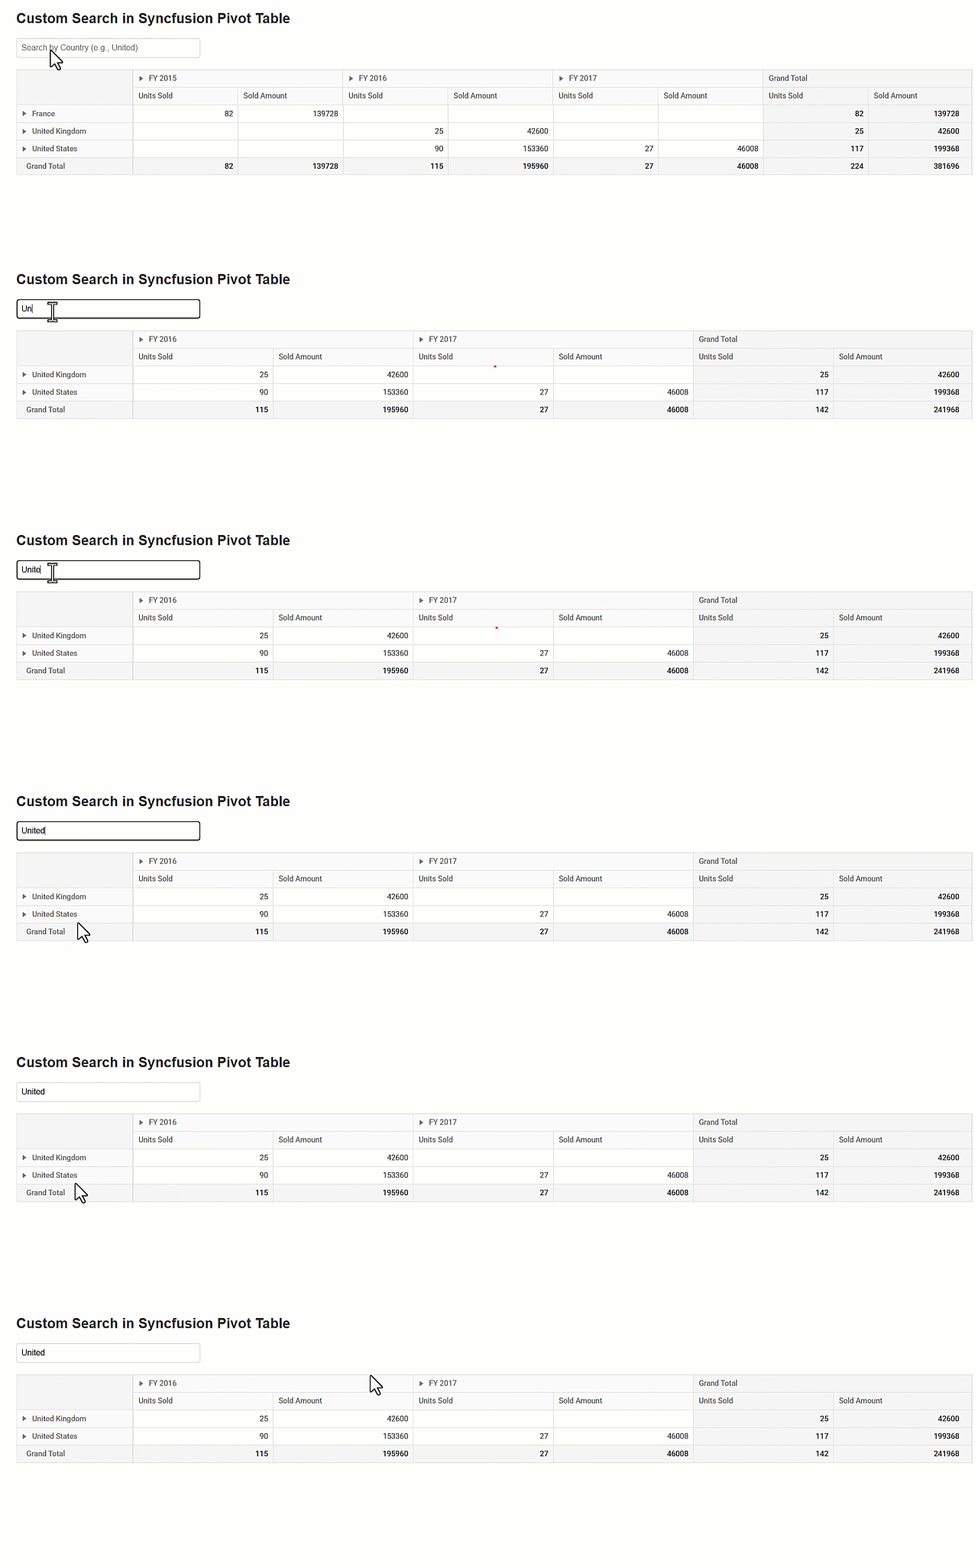
. Type **United** into the search box. The Pivot Table will filter the data to display only rows where ** Country** field contains the text ** United** for example ** United States**, ** United Kingdom**. Clearing the input will reset the filter and all data reappears. If you’ve implemented debouncing, see ** Enhancing the Custom Search** below. The [filtering](https://ej2.syncfusion.com/angular/documentation/pivotview/filtering)
will delay slightly as you type, improving performance by reducing unnecessary updates.
#### Visual demonstration
For a better understanding of how this feature works, refer to the following image. It demonstrates the search functionality in action within the Pivot Table.
Custom search functionality in Angular Pivot Table
## Enhancing the custom search
Here are some ways to extend the custom search implementation:
- ***Dynamic fields***: Incorporate a dropdown using the [Angular DropDown List](https://ej2.syncfusion.com/angular/documentation/drop-down-list/getting-started) component, allowing users to select which field to filter (e.g., ** Country** or ** Products**). Utilize the [change](https://ej2.syncfusion.com/angular/documentation/api/drop-down-list/#change) event of the DropDown List component to capture the selected field name and update the name property in [filterSettings](https://ej2.syncfusion.com/angular/documentation/api/pivotview/dataSourceSettingsModel/#filtersettings) accordingly. ** app.component.html** ```
``` ** app.component.ts** ``` import { ChangeEventArgs, DropDownListModule } from '@syncfusion/ej2-angular-dropdowns'; @Component({ selector: 'app-root', standalone: true, imports: [PivotViewAllModule, PivotFieldListAllModule, FormsModule, DropDownListModule], templateUrl: './app.component.html', styleUrls: ['./app.component.css'] }) export class AppComponent { @ViewChild('pivotview') pivotview!: PivotViewComponent; public fields: string[] = ['Country', 'Products', 'Year']; public searchTerm: string = ''; public selectedField: string = 'Country'; public condition: Operators = 'Contains'; // Apply search filter directly to the Pivot Table's dataSourceSettings applySearch(): void { if (this.searchTerm.trim()) { this.pivotview.dataSourceSettings.filterSettings = [{ name: this.selectedField, type: 'Label', condition: this.condition, value1: this.searchTerm }]; } else { this.pivotview.dataSourceSettings.filterSettings = []; } } changeFieldsddl(args: ChangeEventArgs) { this.selectedField = args.value.toString(); } } ```
- ***Filter conditions**:* Introduce a dropdown similar to the previous step for filter conditions such as ** Equals, StartsWith, EndsWith,**and more, modifying the condition property in [filterSettings](https://ej2.syncfusion.com/angular/documentation/api/pivotview/dataSourceSettingsModel/#filtersettings) . ** app.component.html** ```
``` ** app.component.ts** ``` import { Operators } from '@syncfusion/ej2-angular-pivotview'; export class AppComponent { public operators: string[] = [ 'Contains', 'DoesNotEquals', 'BeginWith', 'DoesNotBeginWith', 'EndsWith', 'DoesNotEndsWith', 'DoesNotContains', 'GreaterThan', 'GreaterThanOrEqualTo', 'LessThan', 'LessThanOrEqualTo', 'Between', 'NotBetween', 'Equals' ]; public condition: Operators = 'Contains'; applySearch(): void { if (this.searchTerm.trim()) { this.pivotview.dataSourceSettings.filterSettings = [{ name: this.selectedField, type: 'Label', condition: this.condition, value1: this.searchTerm }]; } else { this.pivotview.dataSourceSettings.filterSettings = []; } } changeOperatorddl(args: ChangeEventArgs) { this.condition = args.value as Operators; } } ```
- ***Debouncing with RxJS***: For improved performance, especially with frequent typing, debounce the input event to reduce how often ** applySearch()** runs. Debouncing waits until the user pauses typing before applying the filter, preventing excessive re-renders of the Pivot Table. Here’s how to implement it: ** Step 1**: Ensure ** RxJS** is installed ** RxJS** is included with Angular by default. If needed, confirm with ** npm** install ** rxjs**. ** Step 2**: Add a **@ViewChild** reference to the **** element in ** app.component.ts** and import RxJS utilities: ** app.component.ts** ``` import { fromEvent } from 'rxjs'; import { debounceTime } from 'rxjs/operators'; export class AppComponent { @ViewChild('pivotview') pivotview!: PivotViewComponent; @ViewChild('searchInput') searchInput: any; // Reference to the input element } ``` ** Step 3**: Import the ** AfterViewInit** lifecycle interface into ** app.component.ts** and implement it in the ** AppComponent** class. Use the ** ngAfterViewInit** lifecycle hook to set up debouncing after the view is initialized. ``` import { Component, ViewChild, AfterViewInit } from '@angular/core'; export class AppComponent implements AfterViewInit { @ViewChild('searchInput') searchInput: any; // Reference to the input element ngAfterViewInit(): void { // Debounce the input event to optimize performance fromEvent(this.searchInput.nativeElement, 'input') .pipe(debounceTime(300)) .subscribe(() => this.applySearch()); } } ``` ** Step 4**: Update the **** in ** app.component.html** to include the **#searchInput** reference. ** app.component.html** ```
```
## How it works
The **fromEvent** function creates an observable from the **** element’s input events, which fire on every keystroke. The ** debounceTime** operator delays emission until 300 milliseconds have passed without a new event. When the user stops typing for 300ms, ** applySearch()** is called, updating the Pivot Table with the latest ** searchTerm**. This reduces the number of filter applications such as typing ** United** quickly triggers one call instead of seven.
## Why 300ms?
It’s a common debounce duration, balancing responsiveness, short enough to feel instant and performance, long enough to batch rapid inputs. Adjust it to **200ms or 500ms** based on your app’s needs, shorter for snappier feedback or longer for heavier datasets.
## Placement details
The **ngAfterViewInit** lifecycle hook is ideal because it runs after the component’s view, including the **** and ** pivotview**, when fully rendered. This ensures ** this.searchInput.nativeElement** is available. Adding it in ** ngOnInit** would fail since the ** DOM** isn’t ready yet. The subscription lives with the component’s lifecycle, automatically cleaning up when the component is destroyed, avoiding memory leaks.
## GitHub reference
For more details, refer to the sample application available in the [GitHub demo](https://github.com/SyncfusionExamples/angular-pivot-table-with-custom-search-option)
.
## Conclusion
By combining Syncfusion®’s robust [Pivot Table](https://ej2.syncfusion.com/angular/documentation/pivotview/getting-started)
component with Angular 18’s modern features, you can create a smooth, real-time search experience using label filters. From setting up the environment to implementing user-friendly [filtering](https://ej2.syncfusion.com/angular/documentation/pivotview/filtering)
logic and optimizing with RxJS debouncing, this approach offers both performance and flexibility. Want to take it further? Try adding dynamic field selection or integrating more advanced filter types to make your app even more interactive.
Happy coding!
Our Pivot Table is available in our [Blazor](https://www.syncfusion.com/blazor-components/blazor-pivot-table)
, ASP.NET ([Core](https://www.syncfusion.com/aspnet-core-ui-controls/pivot-table)
, [MVC](https://www.syncfusion.com/aspnet-mvc-ui-controls/pivot-table)
, [Web Forms](https://www.syncfusion.com/jquery/aspnet-web-forms-ui-controls/pivot-grid)
), [JavaScript](https://www.syncfusion.com/javascript-ui-controls/js-pivot-table)
, [Angular](https://www.syncfusion.com/angular-ui-components/angular-pivot-table)
, [React](https://www.syncfusion.com/react-ui-components/react-pivot-table)
, and [Vue](https://www.syncfusion.com/vue-ui-components/vue-pivot-table)
component suites. Use it to organize and summarize business data elegantly in any application!
For existing customers, the newest version of Essential Studio is available for download from the [license and downloads page](https://www.syncfusion.com/account/downloads)
. If you are not yet a Syncfusion® customer, you can try our 30-day [free trial](https://www.syncfusion.com/downloads)
to check out the available features.
For questions, you can contact us through our [support forum](https://www.syncfusion.com/forums)
, [support portal](https://support.syncfusion.com/)
, or [feedback portal](https://www.syncfusion.com/feedback/)
. We are always happy to assist you!
## Related Blogs
[Save and Load Reports Efficiently in React Pivot Table Using Redux](https://www.syncfusion.com/blogs/post/save-load-report-in-react-pivot-table)
[Streamline Data Management with Inline Editing in Angular Pivot Table](https://www.syncfusion.com/blogs/post/inline-editing-in-angular-pivot-table)
[RxJS for React: Unlocking Reactive States](https://www.syncfusion.com/blogs/post/react-rxjs-reactive-programming)
[Master Asynchronous JavaScript with RxJS](https://www.syncfusion.com/blogs/post/master-asynchronous-javascript-with-rxjs)