---
title: "Angular Lifecycle Hooks in Practice"
published_at: "2023-01-31T11:00:00+00:00"
modified_at: "2025-11-25T11:45:01+00:00"
url: "https://www.syncfusion.com/blogs/post/angular-lifecycle-hooks-in-practice"
excerpt: "This article discusses Angular lifecycle hooks and when, where, and why they are used in Angular application development."
taxonomy_category:
- "Angular"
- "Development"
- "Web"
taxonomy_post_tag:
- "Angular"
- "Hooks"
- "productivity"
- "Web Development"
---
# Angular Lifecycle Hooks in Practice
[Piumi Liyana Gunawardhana](https://www.syncfusion.com/blogs/author/piumi-liyana-gunawardhana)
**TL;DR:** Angular lifecycle hooks give developers fine-grained control over component behavior during creation, updates, and destruction. This guide explains the nine key hooks, like ngOnInit, ngOnChanges, and ngOnDestroy, their execution order, and practical use cases for initializing data, detecting changes, and cleaning up resources.
[Angular](https://angular.io/)
is one of the most popular front-end frameworks for building component-based robust web applications. A component in an Angular app has a lifecycle that goes through different phases, starting from its instantiation. Lifecycle hooks allow you to hook into those different phases as components are created, updated, and destroyed to gain more control over your application.
In this article, we’ll explore Angular lifecycle hooks, explain when and how to use them, and show practical examples to help you build robust, scalable applications
## What are lifecycle hooks?
Lifecycle hooks are timed methods that get activated by Angular change detection. Since Angular continuously executes change detection on data, the conditions of the current change detection cycle determine how lifecycle hooks are used. The most vital point about lifecycle hooks is the sequence in which they are used. The execution order doesn’t change, and they execute based on a predetermined sequence of load events generated by a detection cycle.
A hook, of course, only works when it satisfies specific criteria as determined by the current change detection cycle. Some resources are only accessible when a specific hook runs. You can use lifecycle hooks to hook into essential stages in the lifecycle of a component or directive to initiate new instances, initialize change detection when required, respond to changes throughout change detection, and clean up before instance destruction.
We can group these hooks into the following two categories:
- Hooks connected to the component itself or directives:
- **[constructor()](#constructor)**
- **[ngOnChanges](#ngonchanges)**
- **[ngOnInit](#ngoninit)**
- **[ngDoCheck](#ngdocheck)**
- **[ngOnDestroy](#ngondestroy)**
- Hooks connected to child components:
- **[ngAfterContentInit](#ngaftercontentinit)**
- **[ngAfterContentChecked](#ngaftercontentchecked)**
- **[ngAfterViewInit](#ngafterviewinit)**
- **[ngAfterViewChecked](#ngafterviewchecked)**
Now let’s look into these, one by one.
### constructor()
A component lifecycle begins with the creation of a component. The **Constructor()** method is the first hook called when Angular calls ** new** on a class to construct a component or directive, and it ensures that the class’s fields and subclasses are properly initialized.
At this time, we cannot access the input properties of the component. None of its subcomponents are created. Furthermore, projected content is also unavailable. After the component has been instantiated, Angular starts the component’s first cycle of change detection.
[Syncfusion Angular components are:LightweightModularHigh-performingExplore Now](https://www.syncfusion.com/angular-components)
### ngOnChanges
**ngOnChanges** is a lifecycle hook that is invoked once on the component’s instantiation and whenever one or more data-bound input properties change before ** ngOnInit()** (if the component contains **@Input**-bound inputs). It gets triggered when Angular changes the data-bound input properties or resets them. A ** SimpleChanges** object with the current and previous property values is passed as an optional parameter to the method.
### ngOnInit
The **ngOnInit** hook is invoked following the first ** ngOnChanges()**. Even when ** ngOnChanges()** is not called when there are no template-bound inputs, ** ngOnInit()** is still invoked. It is triggered upon the completion of initializing data-bound or input properties of a component.
After the completion of child component rendering, **ngOnInit()** gets invoked. Then, even after the data source of the input-bound property gets updated within the parent component, ** ngOnInit()** isn’t invoked. So, we can call the ** ngOnInit()** a one-time-use hook. It solely cares about initialization.
### ngDoCheck
On every change detection run, **ngDoCheck()** is called immediately after ** ngOnChanges()**, and on the initial run, it is called right after ** ngOnInit()**. It detects and responds to changes that Angular alone cannot or will not detect. Following the execution of the default change detector, ** ngDoCheck()** usually carries out change detection.
Developers can explicitly verify their data using **ngDoCheck()** as a custom change detector while combining it with ** ChangeDetectorRef**. However, it is worth noting that it might lead to performance problems when mishandled.
### ngAfterContentInit
Following the first **ngDoCheck**, the ** ngAfterContentInit()** hook is executed. It gets triggered when the component or directive content has been initialized.
### ngAfterContentChecked
**ngAfterContentChecked** is called following ** ngAfterContentInit()** and each subsequent ** ngDoCheck()**. This hook gets invoked after Angular has evaluated the content projected in the directive or component.
### ngAfterViewInit
The **ngAfterViewInit** hook is executed after ** ngAfterContentChecked()**. The view is always loaded immediately after the content. So, it gets triggered after Angular initializes the views and child views of the component or the view containing the directive.
Within this hook, we have access to the **ElementRef** of the ** ViewChildren** after the component has been created. ** ngAfterViewInit** awaits the resolution of either **@ViewChild** or **@ViewChildren** queries. The same view of the component helps us to query these elements. We can use this hook for cases where the loading of view content depends on other view components.
### ngAfterViewChecked
The **ngAfterViewChecked** hook is called after the ** ngAfterViewInit()** and every subsequent ** ngAfterContentChecked()**. It is triggered after Angular has examined the component’s and child’s views or the view that holds the directive. Watch out for setting any variables here that are bound to the template. It will lead to unexpected errors.
### ngOnDestroy
When a component’s lifecycle is over, Angular is in charge of destroying the component. However, several essential detachment steps must be finished before the component or directive can be destroyed. **ngOnDestroy()** is the lifecycle hook responsible for carrying out these steps.
Now, let’s see how to implement Angular lifecycle hooks through a simple example.
Here, we are going to implement a simple component named **UserDetails**. Additionally, the ** UserDetails** component will have a child component named ** Random** to generate user IDs with a user-provided prefix randomly. You may choose to display or hide this ** UserDetails** form from the main view.
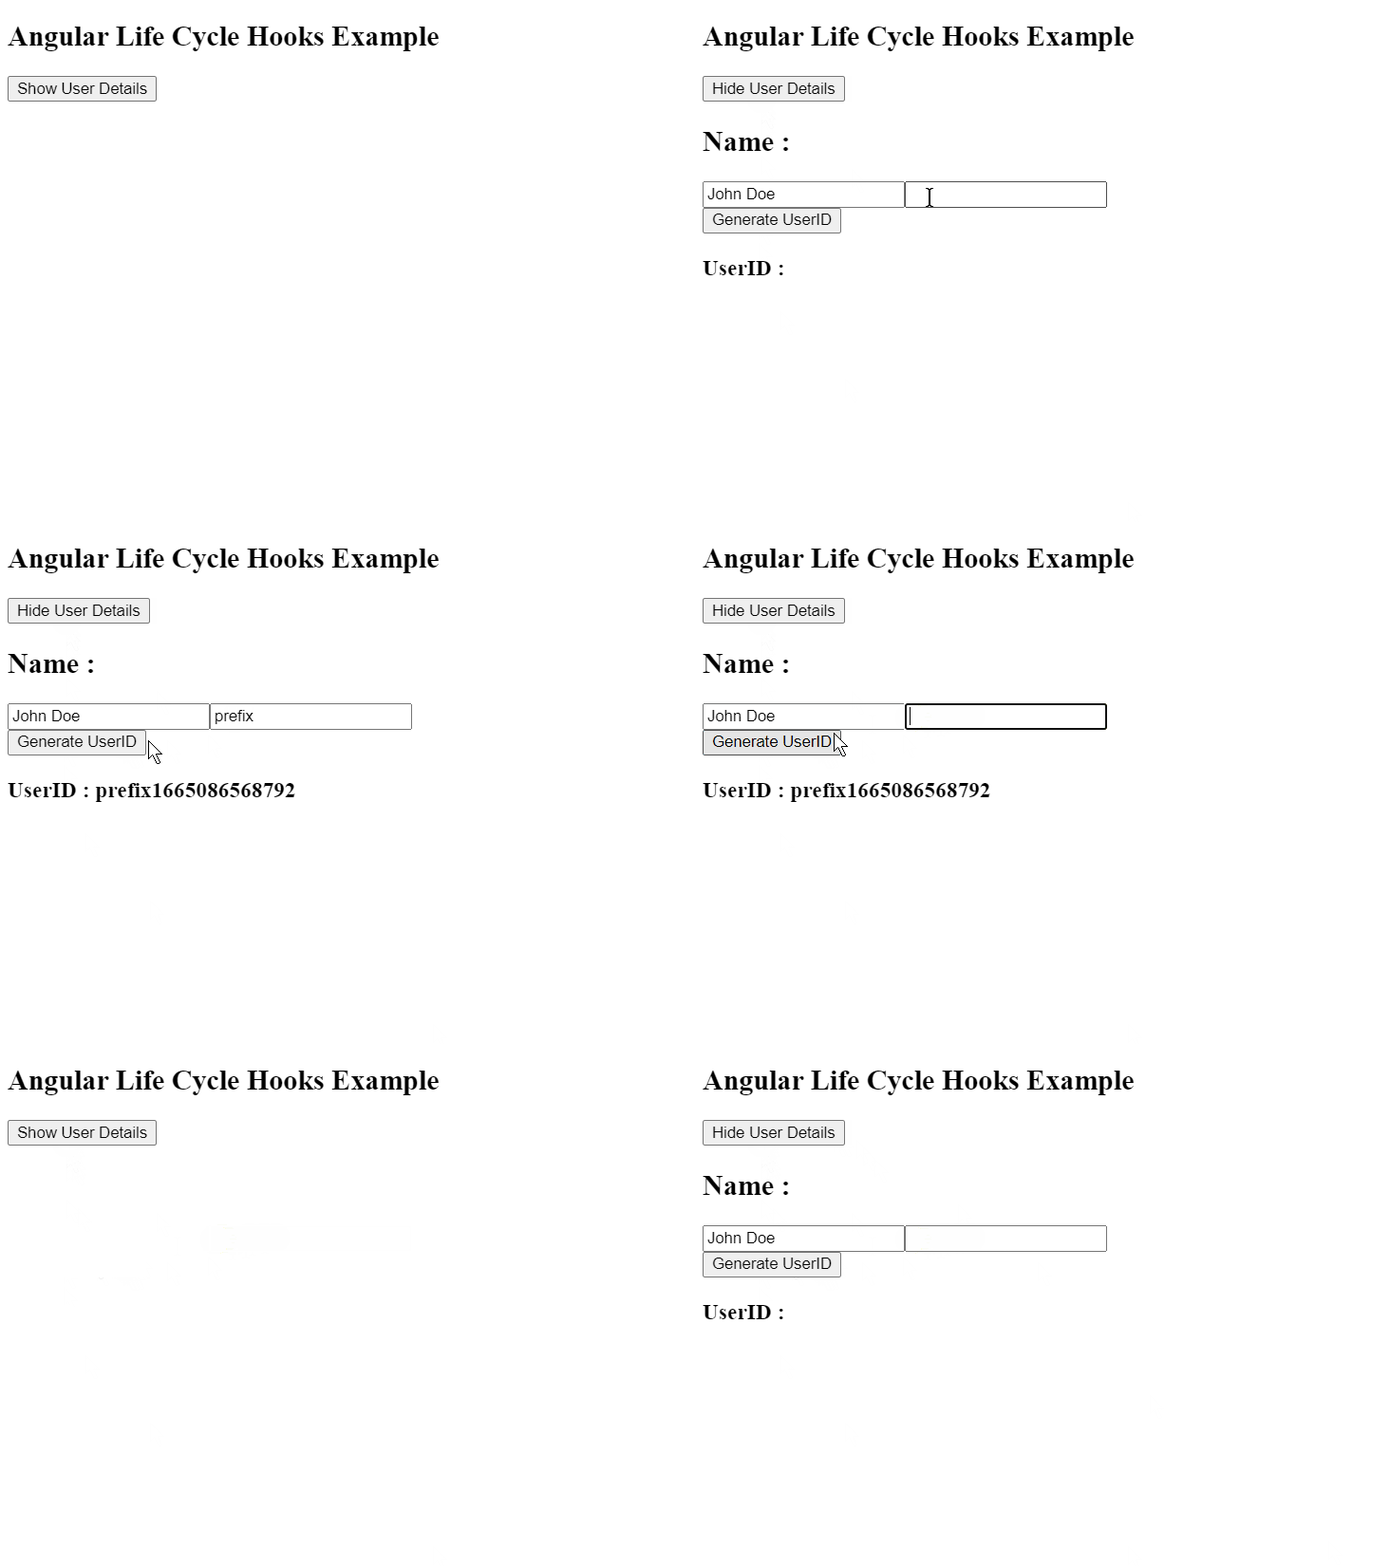
Refer to the code of the **UserDetails** component below.
```
import { Component, Injectable, OnInit, OnChanges, DoCheck, AfterViewChecked, AfterViewInit, AfterContentInit, AfterContentChecked, OnDestroy } from "@angular/core";
@Component({
selector: "userdetails",
template: `
`
})
export class Random implements OnInit, OnChanges, DoCheck, AfterViewChecked, AfterViewInit, AfterContentInit, AfterContentChecked, OnDestroy{
@Input() user:string;
@Output() generateUserId: EventEmitter = new EventEmitter();
constructor(){
this.user = '';
console.log('Child constructor() called');
}
random(){
var t = new Date().getTime();
this.generateUserId.emit(this.user + t.toString());
console.log('random() called');
}
ngOnInit(){
console.log('Child ngOnInit() called');
}
ngOnChanges(){
console.log('Child ngOnChanges() called');
}
ngDoCheck(){
console.log('Child ngDoCheck() called');
}
ngAfterViewChecked(){
console.log('Child ngAfterViewChecked() called');
}
ngAfterViewInit(){
console.log('Child ngAfterViewInit() called');
}
ngAfterContentInit(){
console.log('Child ngAfterContentInit() called');
}
ngAfterContentChecked(){
console.log('Child ngAfterContentChecked() called');
}
ngOnDestroy(){
console.log('Child ngOnDestroy() called');
}
}
```
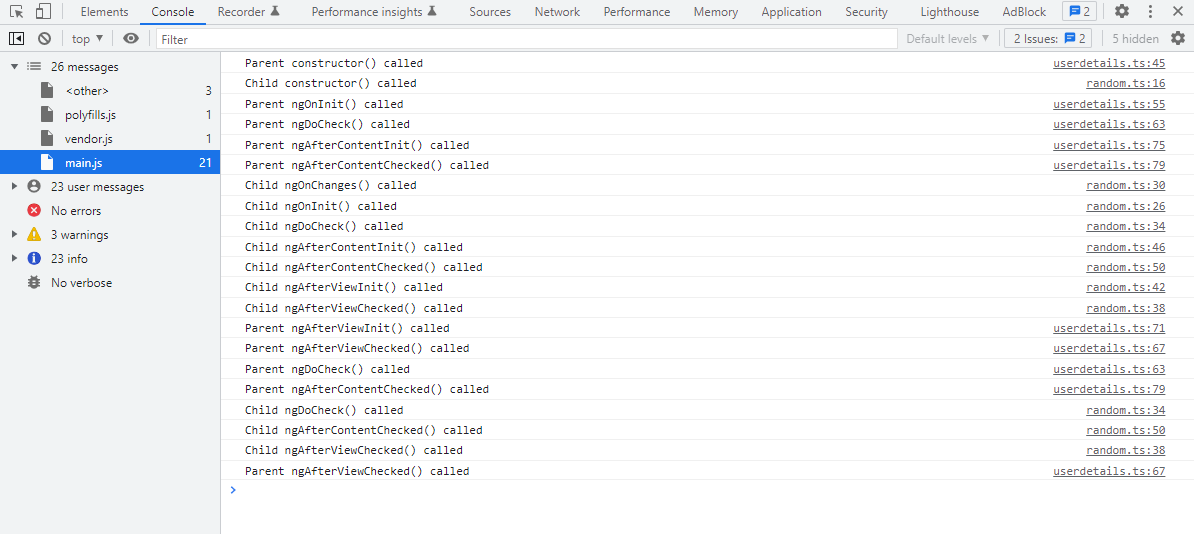
Once you click on the **Show User Details** button, the parent and child components’ constructors run first as the parent component’s initialization occurs.
The application’s main component code is as follows.
```
//app.component.ts
import { Component } from '@angular/core';
@Component({
selector: 'my-app',
templateUrl: './app.component.html',
styleUrls: [ './app.component.css' ]
})
export class AppComponent {
name:string;
showUserDetails: boolean;
btnText: string;
constructor() {
this.showUserDetails = false;
this.btnText = 'Show';
}
toggleUserDetails(){
this.showUserDetails = !this.showUserDetails;
this.btnText = this.showUserDetails ? 'Hide' : 'Show';
}
}
```
```
//app.component.html
Angular Lifecycle Events Example
```
**ngAfterContentInit** and ** ngAfterContentChecked**are invoked immediately after ** ngOnInit()** and ** ngDoCheck()**. This implies that all external HTML will be first rendered. Then, the child component kicks off initializing. As previously explained, whenever any child’s ** Input()**-bound properties are initialized or updated, ** ngOnChanges()** will be called.
Looking closely, we can see that the child component’s **ngAfterViewInit** and ** ngAfterViewChecked** hooks are coming early in the execution sequence. This indicates that the child component view will be first rendered before giving it to the parent. The parent component then relies on the assumption that its own view is finished since its child’s views are done. Therefore, the parent component’s ** ngAfterViewInit** and ** ngAfterViewChecked** hooks are triggered next.
The following figure shows the output flow for the **Show User Details** button click.
Once you type a letter in the text box as a user ID prefix and then click the **Generate UserID** button, you will get the console output like in the following image.
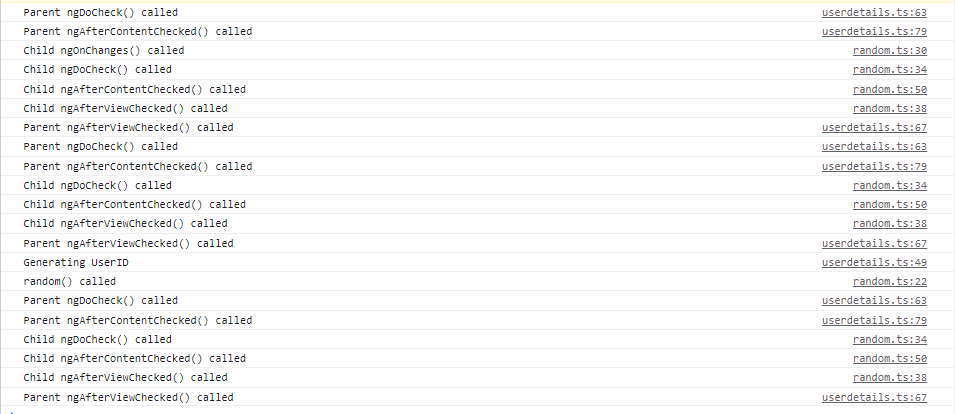So the complete flow would look like the following image.
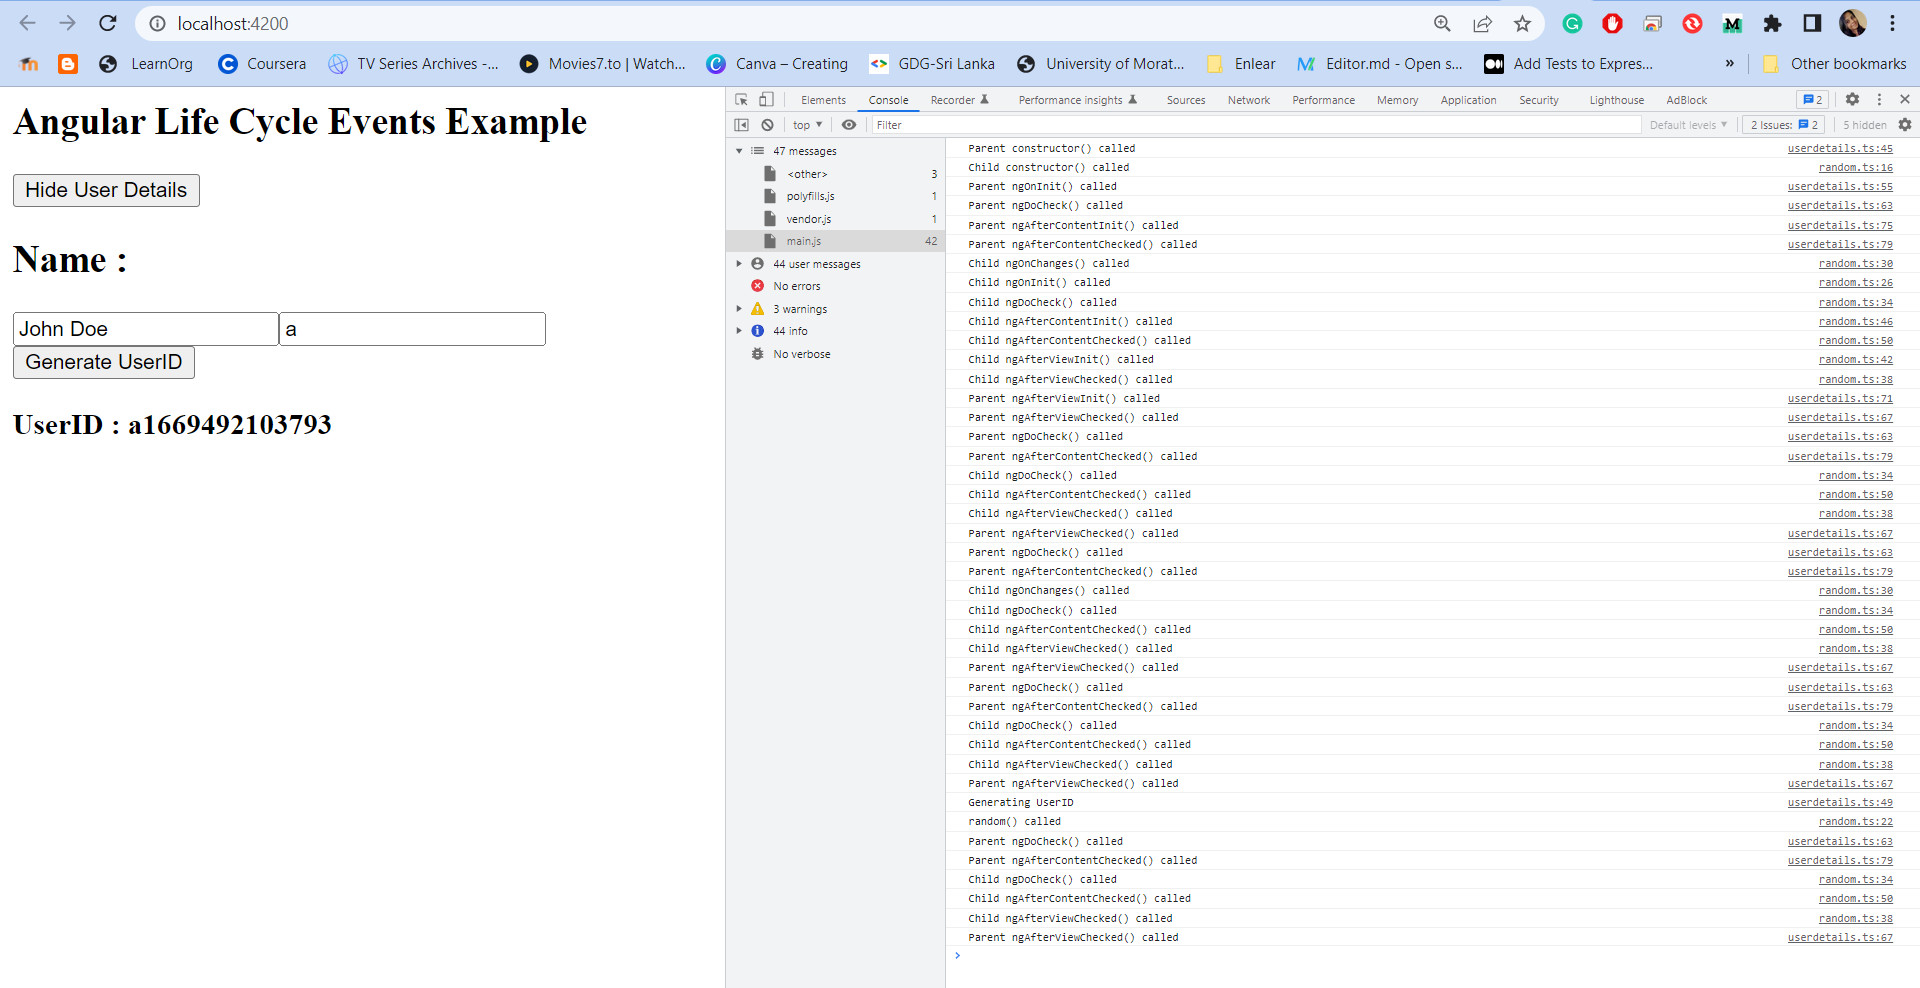The parent component will be destroyed when you click the **Hide User Details** button, depending on *** ngIf**. Since the parent is destroyed, each of its children will also be removed. This means that the parent components will be cleaned up after cleaning up the child components. The result is shown below.

## GitHub reference
For more details, refer to the [Angular Lifecycle Hooks](https://github.com/SyncfusionExamples/angular-life-cycle-hooks-demo)
GitHub repository.
## Conclusion
Thank you for reading! Mastering Angular lifecycle hooks is a powerful way to gain full control over your components, from initialization to cleanup. By understanding when, where, and why these hooks are used, you can build applications that are more predictable, maintainable, and scalable.
Ready to take it further? Experiment with advanced patterns like combining hooks with RxJS for reactive state management or integrating them into custom directives for reusable logic. These techniques will elevate your Angular projects to the next level.
And when it comes to UI components, Syncfusion’s [Angular UI component](https://www.syncfusion.com/angular-ui-components)
library has you covered. With over 80 high-performance, lightweight, and responsive components in one package, it’s the ultimate toolkit for building modern, feature-rich apps.
Check out our Angular demos on [GitHub](https://github.com/syncfusion)
. Also share your feedback or questions in the comments section below!
If you’re a Syncfusion user, you can download the setup from the [license and downloads](https://www.syncfusion.com/account/downloads)
page. Otherwise, you can download a free [30-day trial](https://www.syncfusion.com/downloads/)
.
You can also contact us through our [support forum](https://www.syncfusion.com/forums)
, [support portal](https://support.syncfusion.com/)
, or [feedback portal](https://www.syncfusion.com/feedback)
for queries. We are always happy to assist you!
## Related Blogs
[How to Build an AI-Powered Writing Assistant in Angular Using Google Gemini API (Part 1)](https://www.syncfusion.com/blogs/post/ai-writing-assistant-angular-gemini)
[How to Build an AI-Powered Writing Assistant in Angular Using Google Gemini API (Part 2)](https://www.syncfusion.com/blogs/post/ai-writing-assistant-angular-gemini-2)
[How to Build UML Sequence Diagrams in Angular with Mermaid Syntax](https://www.syncfusion.com/blogs/post/angular-uml-sequence-diagram)
[Syncfusion AI Coding Assistant Now Supports Angular, .NET MAUI, Vue & JavaScript](https://www.syncfusion.com/blogs/?p=207834)