---
title: "How to Add React Dropdown List in a Next.js App?"
published_at: "2024-09-03T11:00:00+00:00"
modified_at: "2026-02-10T09:10:44+00:00"
url: "https://www.syncfusion.com/blogs/post/add-react-dropdown-list-in-next-js"
excerpt: "This blog explains how to add and customize the Syncfusion React Dropdown List component in a Next.js app for better user experience."
taxonomy_category:
- "Development"
- "React"
- "Syncfusion"
- "Web"
taxonomy_post_tag:
- "development"
- "dropdown"
- "Next JS"
- "React"
- "UI"
- "Web"
---
# How to Add React Dropdown List in a Next.js App?
[Prince Oliver](https://www.syncfusion.com/blogs/author/prince-rajarathinam-oliver)
**TL;DR:** Let’s see how to add the React Dropdown List to your Next.js app. The blog covers creating a new Next.js project, installing the Syncfusion React Dropdown List, and customizing it to suit your needs. Enhance user experience with advanced features like data binding, filtering, and custom styling.
Are you looking to enhance the user experience of your [Next.js](https://nextjs.org/)
application by integrating sophisticated dropdown list components?
Look no further than the Syncfusion [React Dropdown List](https://www.syncfusion.com/react-components/react-dropdown-list)
component. Its rich feature set and seamless integration capabilities can take your app to the next level in terms of functionality and aesthetics.
Let’s see how to add the React Dropdown List to your Next.js app easily!
## Prerequisites
Before we begin, ensure you have the following prerequisites:
- [Node.js 18.17](https://nodejs.org/en) or later
- A compatible operating system (macOS, Windows, or Linux)
## Create a Next.js app
Let’s create a Next.js app by following these steps:
1. Start by opening your terminal and running one of the following commands to create a new Next.js app. **Using NPM**``` npx create-next-app@latest ``` ** Using Yarn**``` yarn create next-app ```
2. Follow these prompts to configure your project. You’ll need to define the project name (e.g., **ej2-nextjs-dropdown**) and select the required packages (e.g., ** TypeScript**,** ESLint**,** Tailwind CSS**, and more).``` √ What is your project named? ... ej2-nextjs-dropdown √ Would you like to use TypeScript? ... No / Yes √ Would you like to use ESLint? ... No / Yes √ Would you like to use Tailwind CSS? ... No / Yes √ Would you like to use `src/` directory? ... No / Yes √ Would you like to use App Router? (recommended) ... No / Yes √ Would you like to customize the default import alias (@/*)? ... No / Yes Creating a new Next.js app in D:\Samples\ej2-nextjs-dropdown. ```
## Add Syncfusion React Dropdown List in the Next.js app
Follow these steps to add the Syncfusion [React Dropdown List](https://ej2.syncfusion.com/react/documentation/drop-down-list/getting-started)
component in your Next.js app:
1. First, navigate to the created project directory using the following command.``` cd ej2-nextjs-dropdown ```
2. Now, install the Syncfusion React Dropdowns package using the following command. **Using NPM**``` npm install @syncfusion/ej2-react-dropdowns --save ``` ** Or using Yarn**``` yarn add @syncfusion/ej2-react-dropdowns ```
3. Next, import the Syncfusion CSS styles into your **src/app/globals.css** file. Remove any existing styles and add the following imports. ** globals.css**``` @import '../../node_modules/@syncfusion/ej2-base/styles/material.css'; @import '../../node_modules/@syncfusion/ej2-inputs/styles/material.css'; @import '../../node_modules/@syncfusion/ej2-react-dropdowns/styles/material. css'; ```
4. Now, import and define the **DropDownListComponent** with the [dataSource](https://helpej2.syncfusion.com/react/documentation/api/drop-down-list/#datasource) property in your ** src/app/page.tsx** file. ** page.tsx**``` 'use client' import { DropDownListComponent } from '@syncfusion/ej2-react-dropdowns'; export default function Home() { const sportsData: { [key: string]: Object }[] = [ { Id: 'game1', Game: 'Badminton' }, { Id: 'game2', Game: 'Football' }, { Id: 'game3', Game: 'Tennis' } ]; const fieldSettings: object = { text: 'Game', value: 'Id' }; return ( <> Syncfusion React DropDownList Component
) } ```
## Run the app
Finally, run the application using the following command.
**Using NPM**
```
npm run dev
```
**Using Yarn**
```
yarn run dev
```
After running the app, the React Dropdown List will be added to the Next.js app. Refer to the following image.
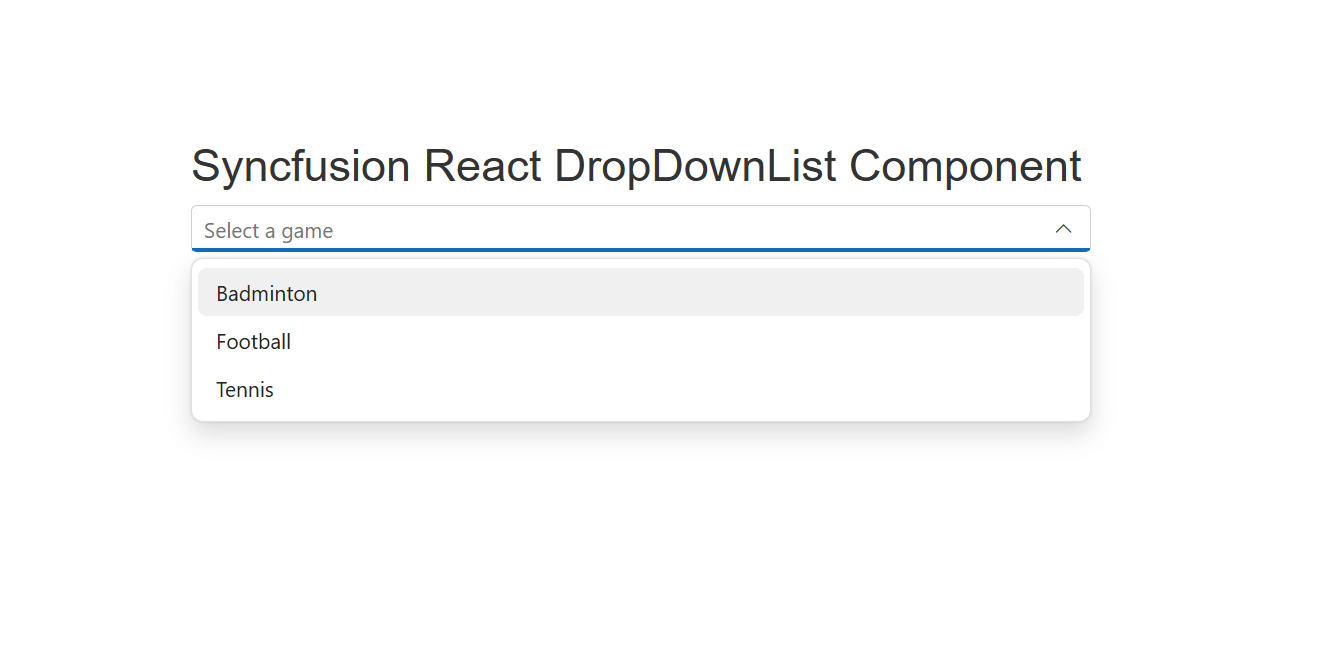
Adding React Dropdown List in a Next.js app
## Customizing the Syncfusion React Dropdown List
Syncfusion Dropdown List offers extensive customization options to tailor the dropdown to your app’s specific requirements. Here are a few standard customization options:
- **Data binding**: You can link the dropdown list to various data sources, including arrays, objects, and remote data.
- **Templates**: Customize the appearance of each item in the Dropdown List using templates.
- **Filtering and searching**: Enable filtering and searching capabilities to help users find items quickly.
- **Grouping**: Group related items together for better organization and user experience.
- **Styling**: Apply custom styles to the Dropdown List to match your app’s design.
**Note:** Refer to the [Customization in React Dropdown List documentation](https://ej2.syncfusion.com/react/documentation/drop-down-list/style)
for more details.
## Conclusion
Thank you for reading! In this blog, we’ve covered how to integrate and customize the Syncfusion [React Dropdown List](https://www.syncfusion.com/react-components/react-dropdown-list)
component in your Next.js app to enhance user experience. Like this, you can also add other [Syncfusion React components to your Next.js app](https://ej2.syncfusion.com/react/documentation/getting-started/nextjs)
to easily build robust apps.
If you’re already a Syncfusion user, you can download the latest version of Essential Studio® from the [License and Downloads](https://www.syncfusion.com/account/downloads)
page. If you’re new to Syncfusion, we invite you to try our components with a [30-day free trial](https://www.syncfusion.com/downloads)
to explore their features and capabilities.
If you need any assistance, feel free to contact us through our [support forum](https://www.syncfusion.com/forums)
, [support portal](https://support.syncfusion.com/)
, or [feedback portal](https://www.syncfusion.com/feedback)
. We’re always happy to help you!
## Related blogs
- [What’s New in React 19?](https://www.syncfusion.com/blogs/post/whats-new-in-react-19)
- [What’s New in Next.js 15 RC?](https://www.syncfusion.com/blogs/post/whats-new-in-next-js-15-rc)
- [Top 7 Ways to Write CSS in Your React or Next.js App](https://www.syncfusion.com/blogs/post/write-css-react-next-js)
- [Optimize Next.js App Bundle and Improve Its Performance](https://www.syncfusion.com/blogs/post/optimize-next-js-app-bundle)