---
title: "4 Easy Steps to Embed a JavaScript Control into a Blazor App"
published_at: "2021-11-10T10:30:58+00:00"
modified_at: "2026-05-18T13:19:49+00:00"
url: "https://www.syncfusion.com/blogs/post/4-easy-steps-to-embed-a-javascript-control-into-a-blazor-app"
excerpt: "Blazor is an open-source, single-page web application development framework developed by Microsoft. Even though it depends on NuGet packages, it also supports the use of npm packages. npm contains a broader range of libraries, frameworks, and web components. Furthermore, the..."
taxonomy_category:
- "Blazor"
- "Excel"
- "JavaScript"
- "Spreadsheet"
- "Tips and Tricks"
taxonomy_post_tag:
- "Blazor"
- "JavaScript"
- "productivity"
- "Spreadsheet"
- "Web Development"
---
# 4 Easy Steps to Embed a JavaScript Control into a Blazor App
[Hari Venkatesh E](https://www.syncfusion.com/blogs/author/harivenkateshe)

[Blazor](https://en.wikipedia.org/wiki/Blazor)
is an open-source, single-page web application development framework developed by Microsoft. Even though it depends on [NuGet packages](https://en.wikipedia.org/wiki/NuGet)
, it also supports the use of [npm packages](https://en.wikipedia.org/wiki/Npm_(software))
.
npm contains a broader range of libraries, frameworks, and web components. Furthermore, the web components are downloaded as independent modules and styles. npm allows us to construct the required control with only the necessary modules and CSS, resulting in less memory utilization.
In this blog, we will see how to import npm packages as well as declare and embed a JavaScript control into a Blazor application in detail. To demonstrate, we will download the [Syncfusion JavaScript Spreadsheet npm package](https://www.npmjs.com/package/@syncfusion/ej2-spreadsheet)
and add it to the Razor page.
## Step 1: Initializing npm and other necessary packages.
To begin, launch Visual Studio and create a Blazor WebAssembly application. The npm option is not available by default in this new application. So, create a new folder named **npm_packages** to initialize the npm and other options to hold the downloaded packages and the control definition.
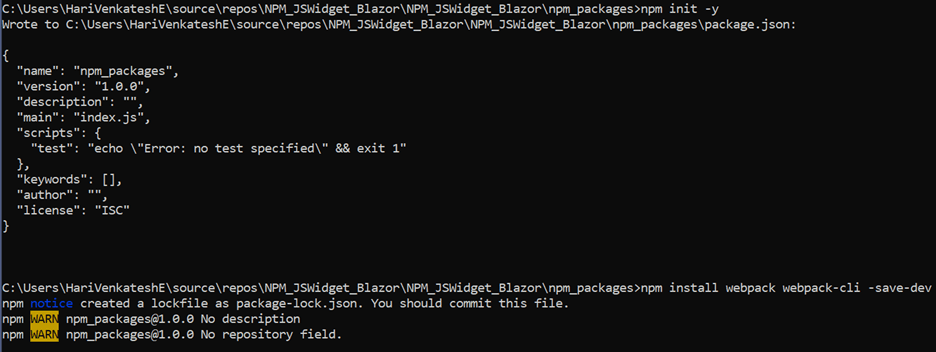
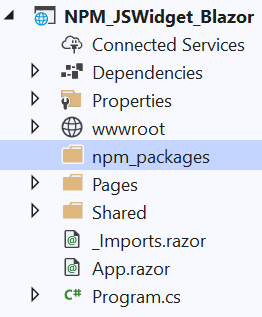To initialize npm and download the prerequisite packages, run the command prompt and navigate to the **npm_packages** folder directory. Then, execute the following commands in the specified order:
1. Install npm. This will automatically create the **package.**** json** file inside the ** npm_packages** folder.
2. Install the webpack utility. This will assist in module bundler and JavaScript conversion.
3. Install the latest NPM package of the Syncfusion [JavaScript Spreadsheet control](https://www.syncfusion.com/javascript-ui-controls/js-spreadsheet) . | npm init -y npm install webpack webpack-cli –save-dev npm install @syncfusion/ej2-spreadsheet | | --- |
## Step 2: Initializing and defining the Syncfusion JavaScript Spreadsheet control.
Once npm is configured, you can see the **package.json** file inside the ** npm packages** folder. Now, create a folder named ** src** within it create the ** index.js** file. Then, import the Syncfusion JavaScript Spreadsheet modules and define the widget in the ** index.js** file.
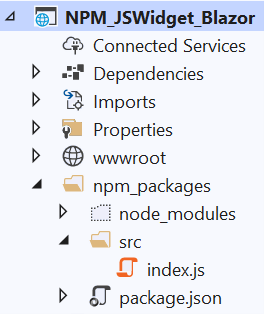To define the Syncfusion JavaScript Spreadsheet control, first, add a div container with the ID **element** to the ** Index.razor** page.
Refer to the following code.
**[Index.razor]**
```
@page "/"
Syncfusion JavaScript Spreadsheet control
```
Then, define the control in the **index.js** file with the necessary module(s) and add it to the div container using its ID.
**[index.js]**
```
import { Spreadsheet } from '@syncfusion/ej2-spreadsheet';
// Define the Syncfusion JavaScript Spreadsheet component.
var numberFormat = '$#,##0.00';
var spreadsheet = new Spreadsheet({
sheets: [
{
name: 'Monthly Budget',
selectedRange: 'D13',
rows: [
{
cells: [
{ value: 'Category', style: { fontWeight: 'bold', textAlign: 'center' } },
{ value: 'Planned cost', style: { fontWeight: 'bold', textAlign: 'center' } },
{ value: 'Actual cost', style: { fontWeight: 'bold', textAlign: 'center' } },
{ value: 'Difference', style: { fontWeight: 'bold', textAlign: 'center' } }
]
},
{
cells: [
{ value: 'Food' },
{ value: '7000', format: '$#,##0.00' },
{ value: '8120', format: '$#,##0.00' },
{ formula: '=B2-C2', format: numberFormat }
]
},
{
cells: [
{ value: 'Loan' },
{ value: '1500', format: '$#,##0.00' },
{ value: '1500', format: '$#,##0.00' },
{ formula: '=B3-C3', format: numberFormat }
]
},
{
cells: [
{ value: 'Medical' },
{ value: '300', format: '$#,##0.00' },
{ value: '0', format: '$#,##0.00' },
{ formula: '=B4-C4', format: numberFormat }
]
},
{
cells: [
{ value: 'Clothing' },
{ value: '400', format: '$#,##0.00' },
{ value: '140', format: '$#,##0.00' },
{ formula: '=B5-C5', format: numberFormat }
]
},
{
cells: [
{ value: 'Education' },
{ value: '900', format: '$#,##0.00' },
{ value: '750', format: '$#,##0.00' },
{ formula: '=B6-C6', format: numberFormat }
]
},
{
cells: [
{ value: 'Insurance' },
{ value: '30', format: '$#,##0.00' },
{ value: '30', format: '$#,##0.00' },
{ formula: '=B7-C7', format: numberFormat }
]
},
{
cells: [
{ value: 'Utilities' },
{ value: '130', format: '$#,##0.00' },
{ value: '160', format: '$#,##0.00' },
{ formula: '=B8-C8', format: numberFormat }
]
},
{
cells: [
{ value: 'Enterainment' },
{ value: '500', format: '$#,##0.00' },
{ value: '730', format: '$#,##0.00' },
{ formula: '=B9-C9', format: numberFormat }
]
},
{
cells: [
{ value: 'Maintainance' },
{ value: '50', format: '$#,##0.00' },
{ value: '70', format: '$#,##0.00' },
{ formula: '=B10-C10', format: numberFormat }
]
},
{
cells: [
{ value: 'Transportation' },
{ value: '250', format: '$#,##0.00' },
{ value: '400', format: '$#,##0.00' },
{ formula: '=B11-C11', format: numberFormat }
]
},
{
cells: [
{ value: 'Gifts/Donations' },
{ value: '0', format: '$#,##0.00' },
{ value: '100', format: '$#,##0.00' },
{ formula: '=B12-C12', format: numberFormat }
]
},
{
cells: [
{ index: 2, value: 'Total Difference:', style: { fontWeight: 'bold', textAlign: 'right' } },
{ formula: '=D2+D12', format: numberFormat, style: { fontWeight: 'bold' } }
]
}
],
columns: [
{ width: 110 }, { width: 115 }, { width: 110 }, { width: 100 }
]
}
]
});
// Render the defined spreadsheet.
spreadsheet.appendTo('#element');
```
## Step 3: Adding build script to the application.
Now, let’s include the following build script in the **package.json** file. It uses webpack to bundle the JavaScript file. This script tells the webpack to use the ** index.js** file in the ** src** folder as the source file.
The output directory of the bundled file is then set to be created under the **js** folder in the ** wwwroot** folder directory as ** index.bundle.js**.
Refer to the following code.
[**package.json**]
```
"scripts": {
"build": "webpack ./src/index.js --output-path ../wwwroot/js --output-filename index.bundle.js"
}
```
To bundle the module(s) and control definition periodically, we have to add a prebuild step to the ***.csproj** file. Bundling occurs when you build or rebuild the application.
**[*.csproj]**
```
………
```
## Step 4: Adding necessary JS and CSS for the control.
Finally, when the application is built, the **index.bundle.js** file will be generated. We have to add it to the application via the ** index.html** file in the ** wwwroot** folder. Copy and paste the appropriate CSS stylesheet from the ** node_modules\@syncfusion\~** to the ** wwwroot\css** folder path, then add it to the application via the ** index.html**file.
**Note:** Since it is a JavaScript control, we have to initialize the div container within the ** Index.razor** file before the scripts containing the module(s) and definition. To achieve this, make the following changes to the ** index.html** code, which will load the scripts after the Blazor starts.
**[index.html]**
```
......
......
......
......
```
Now, run the application. Then, you can see the JavaScript Spreadsheet control in your Blazor WebAssembly application.
Refer to the following screenshot.
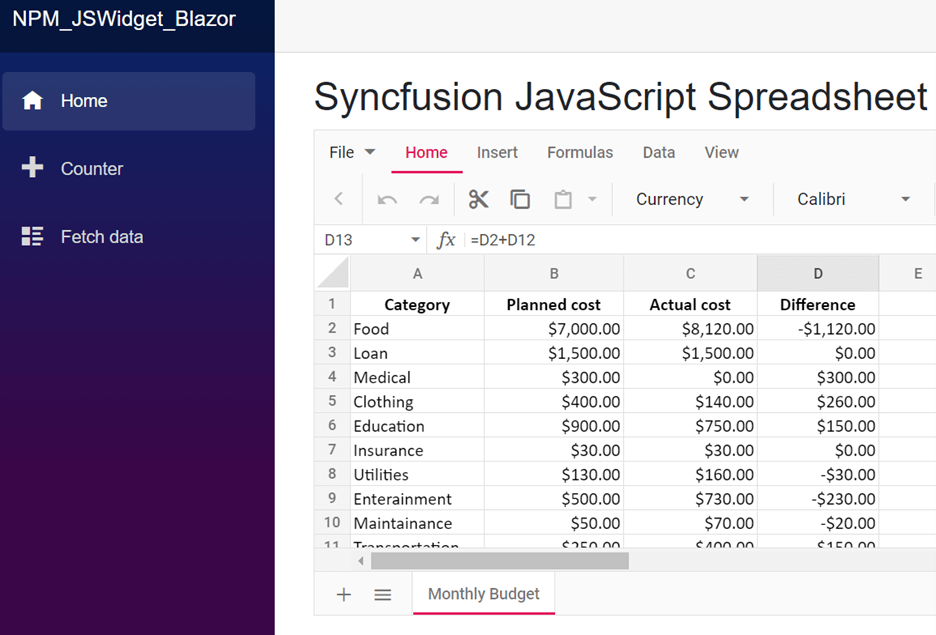
Embedding a JavaScript Spreadsheet into Blazor app
## References
For more information, refer to the following reference links:
- [Embed a JavaScript control into a Blazor app using npm packages demo](https://www.syncfusion.com/downloads/support/directtrac/general/ze/NPM_JSWidget_Blazor-1656985146) .
- [How do I use npm packages in Blazor WebAssembly?](https://www.syncfusion.com/faq/blazor/webassembly/how-do-i-use-npm-packages-in-blazor-webassembly)
- [How do you bundle and minify the CSS and JS files in Blazor applications?](https://www.syncfusion.com/faq/blazor/general/how-do-you-bundle-and-minify-the-css-and-js-files-in-blazor-applications)
## Conclusion
Thanks for reading! In this blog post, we have seen how to embed a JavaScript control into a Blazor application using npm packages. As the npm packages allow us to construct the required control with only the necessary modules and CSS, we can considerably reduce memory utilization. Try out the steps given in this blog post and leave your feedback in the comments section given below!
The Syncfusion [Blazor suite](https://www.syncfusion.com/blazor-components)
offers over 70 components that work with both Blazor server- side and client-side (Blazor WebAssembly) projects seamlessly. Use them to build astonishing applications!
For existing customers, the newest version of Essential Studio® is available for download from the [License and Downloads](https://www.syncfusion.com/account/downloads)
page. If you are not yet a Syncfusion customer, you can try our 30-day [free trial](https://www.syncfusion.com/downloads)
to check out the available features.
For questions, you can contact us through our [support forum](https://www.syncfusion.com/forums)
, [Direct-Trac](https://www.syncfusion.com/support/directtrac/incidents)
, or [feedback portal](https://www.syncfusion.com/feedback/javascript)
. We are always happy to assist you!
## Related blogs
- [Simple Steps to Validate Data in a JavaScript Spreadsheet](https://www.syncfusion.com/blogs/post/simple-steps-to-validate-data-in-a-javascript-spreadsheet.aspx)
- [How to Bulk Edit Columns in JavaScript DataGrid](https://www.syncfusion.com/blogs/post/bulk-edit-columns-in-javascript-datagrid.aspx)
- [Syncfusion Blazor Code Snippets in Visual Studio Code for MAC: An Overview](https://www.syncfusion.com/blogs/post/syncfusion-blazor-code-snippets-in-visual-studio-code-for-mac-an-overview.aspx)
- [Schedule Your Tasks Like A Pro in Blazor Applications](https://www.syncfusion.com/blogs/post/schedule-your-tasks-like-a-pro-in-blazor-applications.aspx)